
I knitted this pink shrug from the pattern “Molly” in the book, “Junior Knits” by Debbie Bliss. I used Debbie Bliss cashmerino aran. It’s still a wee bit big on my daughter, but she’ll grow into it soon.
Tag: daughter
-

Amigurumi Bunnies
It’s been over 20 years since I crocheted anything. I learned how to make doilies and toilet paper cozies back in high school, but I hadn’t picked up a crochet needle since.
Then I saw these adorable Amigurumi creatures. I wanted to make some too. Here are my first two tries. They look a bit ramshackled, but not bad for a newbie. The next one will be cuter.
-
Dressmaking
My grandmother was a passionate dressmaker. She was constantly on her old treadle sewing machine, churning out clothing for herself and her family. Sometimes she’d admire a dress on TV, stay up all night making it and have the garment finished by morning.
As a young girl, I spent a lot of time with her, watching her work, listening to her stories. My initial attempts at sewing on her machine were disastrous, and caused my grandmother a lot of stress, so I just tried to learn from watching.
As an adult I participated in a lot of theatre productions. When I wasn’t acting, directing or stage managing, I was making or altering costumes. Now that I’m a mom, I’m having a great time making Halloween costumes and dresses for the little one.
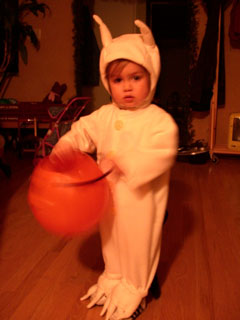 At two years old, she was Max from her favorite book, Maurice Sendak’s Where The Wild Things Are. I scoured the internet for photos of this costume. I found a pattern for a body suit for toddlers and added the feet, tail and headdress.
 I used an ivory colored fleece blanket to make this costume warm enough for Trick or Treating. My biggest peeve with commercially made costumes is that they are made with such thin, cheapo material, totally inconsiderate of the time of the year the costume is going to be worn outdoors. This gives me every reason to make our own costumes! I want to make a great costume that is also comfortable to wear.
 At three years old, she was infatuated with Disney’s Cinderella movie. She loved the Fairy Godmother, so I thought that would make a magical costume for Halloween. I never got a picture of the whole ensemble. The cloak always manages to be whipped off before I can get a photo, but here is the inner gown, a classic bell-sleeve dress, lined of course, for added comfort and warmth.
She wore this dress for days before Halloween. I always feel so richly rewarded by her appreciation of the work I do.
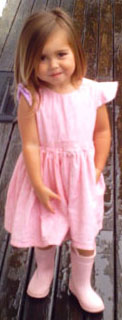 This pink dress on the right, for instance, I am so embarrassed by. It was the first dress I made that year, sort of a trial run before I attempted to make her Fairy Godmother costume. The stitches are messy, the zipper looks hideous, some seams are not well tucked resulting in frays, and worst of all, I sewed the sleeves on upside down. (See how the sleeves bell out like she belongs in a sci-fi movie? It’s not supposed to be that way.)
 Regardless of all that, she wore that dress everyday since I made it. I would hide it under other clothes in her drawer, and she would dig it out. I love her. She is teaching me everyday to love myself too.
For her third birthday, I asked her what she wanted. She replied, “Something orange.” Makes sense, considering she was born at dawn on November 1.
I made her this orange and cream dress to wear to her birthday party. It’s fully lined, and I’m really really proud of it. She still wears this dress a lot, and considering that she wore her two-year-old birthday dress until it looked like a blouse on her, I imagine she’ll be wearing this dress until she can’t squeeze in it anymore.
Recently I went on a marathon dressmaking spree getting some special springtime pieces in our wardrobes.


Skirts are the easiest clothing pieces to make. One barely needs a pattern as long as one has the correct measurements. I made this striped candy-colored skirt with a ruffled hem, and a pink and maroon Pink Panther polkadot skirt with two ruffled tiers and rickrack edges (amazing what a little rickrack can do!) all in one night.

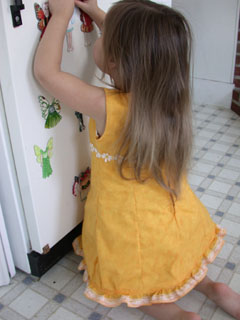
I’m really proud of this golden yellow dress. I purchased a pattern for the dress, added the white lace edging on the bodice and on the hem, and the little daisy chain belt. It is fully lined with soft cotton suede, so that it’s wearable in the spring when the air is still cool.
I’m still perfecting zipper installation. It’s not bad, but it’s not super yet. I’ll be making more dresses to keep practising.
-
Winter Knitting Projects


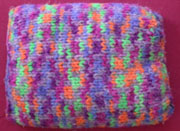
As soon as we moved in to Camden, Maine for the winter, I found a little knitting and needlepoint shop in the village called Stitchery Square. I bought several skeins of Debbie Bliss alpaca silk double knit yarn (80% baby alpaca and 20% silk) in bright pink and made matching Mama and Baby scarves.
The scarves are knit in a 2×2 rib with US size #6 straight needles. For Baby’s, cast on 32 stitches, then knit 2, purl 2 till the end of the row. Repeat for each row until one skein of yarn is used up. Bind off. Easy does it!
Mama’s is similar, except I cast on 44 stitches. Knit 2, purl 2 till the end of the row and repeat. When one skein is used up, add a second skein of the same yarn, and bind off at the end of the second skein. The rib makes the scarf so soft and thick, very snugglicious!

I used the same yarn and 2×2 rib pattern, this time knitting in the round with double pointed needles, for making legwarmers for the little one, which actually wound up being pulled over snow boots to keep the snow from getting into the boots.
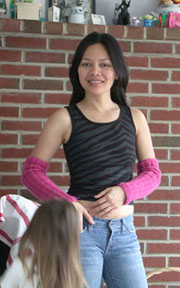 I also made myself a pair of arm warmers using the same Debbie Bliss alpaca silk yarn, the same 2×2 rib pattern with double-pointed needles.
For both my arm warmers and my little one’s legwarmers, I cast on 48 stitches, divided among three double pointed needles. With a fourth double pointed needle, I knit into the first stitch I cast on, forming a triangle. Knit 2, purl 2 around and around until the end of the skein. Bind off.
 For Christmas, I made my mother-in-law a pair of these luxuriously soft armwarmers using Debbie Bliss cashmerino aran. Cashmerino Aran is thicker than Alpaca Silk, containing 55% merino wool, 33% microfiber and 12% cashmere. Knitting them in 2×2 rib pattern thickens the fabric even more, but the vertical lines are slimming.
For my mother-in-law’s arm warmers, I cast on 60 stitches, divided among three US size #8 double pointed needles. Knit 2, purl 2 all around till the skein is used up. Add the white Cashmerino Aran, knit 2, purl 2 for 3 rows, then bind off. The white cuffs give it that winter snow edge to finish the look.
I still had a lot of leftover Cashmerino Aran in white, so I made
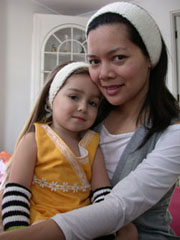 matching earwarmers for the little one and me. I based mine on the Head Huggers pattern in Stitch ‘n Bitch Nation
, page 59, but left out the decorative flowers and leaves. I just wanted a simple and classic look, not too many floral frills. For the smaller earwarmer, I started out using the neckwarmer pattern, then just carried on as it made sense to fit my little girl.
These earwarmers are really warm. Sometimes I forget and leave them on while indoors, to keep my hair out of my face like a hairband. Before long I get a headache from being too warm.
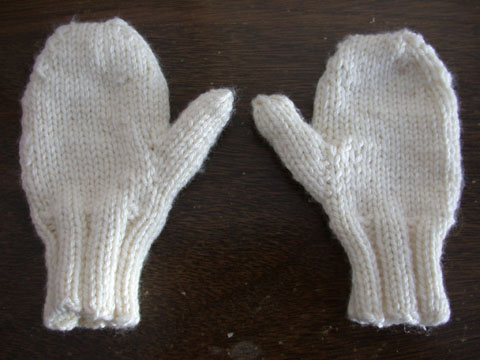
 One more project using Debbie Bliss Cashmerino Aran is my 3-year-old’s mittens. I originally tried making up my own pattern, but failed miserably. Look at this pathetic-looking mitten on the right. At first I thought I’d make arm-warmers-cum-mittens, thin in the arm part, tapering off in the wrist, ribbed for elasticity. It was really a bad idea, but I just had to see it come to fruition before I realized I needed to humble myself and look to the master knitters for complicated projects like mittens.
Junior Knits
has a pattern for mittens for 3-year-olds. In fact, you can see the pattern in its entirety in the “Search Inside” function for this book on Amazon. The pattern is called Nell mittens.
I modified it slightly by changing it from a button wrist to one that’s ribbed. I also decided to knit it in the round instead of using straight needles.
Using double pointed needles US size #7, I cast on 30 stitches, divided among 3 double pointed needles, and knit 3, purl 2 in the round for 15 rows. On rows 16 to 20, I knit all 30 stitches around.
From here, refer to the Nell mittens pattern, starting at “Shape thumb.” Instead of doing the purl rows, do knit rows since we are knitting in the round, except on the 7th row where one must follow the pattern exactly.
Happy knitting! Stay warm!!!
-
Learning to Knit
 I mentioned to my husband once while passing the yarn aisle at a craft store that I had never knitted before. It was more of a wistful sigh than a real wish. At that time I was balancing working at home and taking care of a two-year-old. I had no time to pick up a new hobby.
Christmas 2006, my husband got me knitting books, various sizes of knitting needles and some yarn. I was so excited! As soon as the holiday season was over, I got to work learning how to knit.
I was horrible. My swatches looked like a wet hamster. My sweet man and my toddler rescued these unfortunate creations from the trash and wrapped them around naked troll dolls. When I finally got the hang of it, I finished my first knitted piece – a red scarf for the most amazing man in my life.
I have since learned how to purl, and how to mix knit and purl together to create ribbed, stockinette and every other combination the two could make. It’s been a great year. Here are some of the items I made:
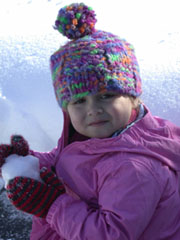 Pompom Hat
Most commercially available yarns have an easy to follow pattern inside the label. This chunky acrylic yarn had a pattern for a pompom hat. I knitted it with straight needles and sewed the seam together all in one night.
It was really rewarding to have a finished project after just a couple of hours. This was my second knitting project, after the red scarf, and it gave me a chance to practice knit and purl. I also got a lot of compliments from grannies everywhere we went.
Pompom hats rock!
 Space Invaders hat and tank top
The tank top is from the Mud Flap Girl Tank Top pattern on Stitch ‘n Bitch Nation
I used Lion Brand 100% cotton yarn (black) and Lily Sugar ‘n Cream 100% cotton yarn (green) instead of the recommended wool/cotton blend. My swatch calculations were off, so the tank top actually fits too loose on me. I’m not too happy with my ratty crochet edging either, but I learned a lot and had fun, which is all that matters anyway.
The hat, I just made up as I went along, using the same Space Invaders design and the same 100% cotton yarn. I used straight needles and sewed the seams together.
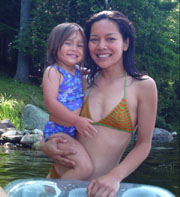 Orange and green bikini
I made a few tiny modifications to the bikini pattern in Stitch ‘n Bitch: The Knitter’s Handbook
, page 224. The yarn the pattern recommends, Classic Elite Star, a 99% cotton and 1% lycra blend, is a discontinued line, so I could only get one skein each of orange and green from Ebay.
I made the neck straps thicker at 3 stitches, instead of the crocheted chain stitch the pattern called for.
I wore this bikini swimming all summer and it was great! Unlike nylon or polyester bikinis, this pair absorbed water more, so drying it on a clothesline took slightly longer than drying a synthetic fabric, but not by much. It was definitely dry after hanging it overnight.

Black hat with multi-color fuzz
Shortly after we came to Maine for the summer, I made this hat out of the Lion Brand Mystery yarn, Onyx Prism, which is acrylic and wool in black with multi-color fuzzies randomly interspersed. I did the whole hat in garter stitch, straight needles then sewed the seam. This hat is a lot of fun, almost like a granny hat.
 Hammock Pillow
Jay wanted a pillow to take with him when he relaxes on the hammock outdoors, so I made him this technicolor hammock pillow with chunky yarn left over from making the pompom hat earlier in the year. Malaya helped me stuff it, and immediately after, wanted a pillow of her own.
 Hoppy Hoppy
This is just a basic rectangular pillow knitted in Lion Brand Fancy Fur, Stormy Sea, a hairy polyester yarn. After I finished sewing the seams, Malaya helped (over)stuff the pillow and named it “Hoppy Hoppy,” the weasel.
I love that I can make something as simple and clunky as this hairy pillow and she can turn it into a fantastic creature just by the sheer strength of her imagination. She pets it, hugs it, talks to it and takes it places. It has become her all-time favorite furry pet and I couldn’t be happier!
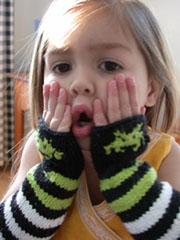 Space Invaders Arm Warmers
More use for my stash of 100% cotton yarn and the same Space Invaders design pattern from my tank top and hat above.
I learned how to use double pointed needles on this project. It looks complicated, but once I got one row deep, it all went like clockwork. It’s simple enough to make without a pattern.
These arm warmers look awesome on her, too. They make her look like a little videogame geek. I love it!
-

A Trip to the Sheep Farm

On Open Farm Day, we went to Ellsfarm, a family owned sheep farm in Union, Maine. Their sheep are raised free range, providing healthy dairy products, meat and wool.
Farmer Perry Ells names her sheep after movie stars. We saw Madeline Khan and Maggie Gyllenhaal; matrilineal succession marked by the same letter of each animal’s first name.
The sheep were already sheared in the beginning of the summer season, but for the sake of demonstration, Farmer Perry Ells showed us how it is done.
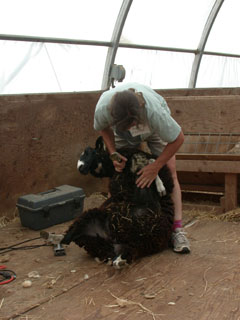

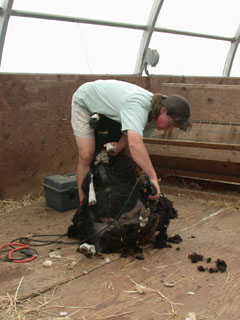
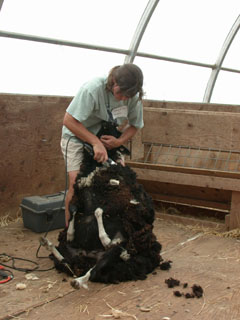
Nice and cool after being sheared.

 I couldn’t pass up the yarn they had for sale. The wool is raised and spun right there at Ellsfarm. The dark yarn is all natural, no dyes, just bare dark wool straight from the sheep. The light cream colored yarn is dyed with all natural henna. No harsh chemicals or synthetic dyes.
It was very exciting to have met the sheep that my yarn came from.
 The color scheme matched Jay’s wardrobe perfectly, so I decided I would make him something. Since 100% wool tends to be heavy and itchy I thought something that had limited exposure to bare skin, like a hat, would be best.
I knitted with double pointed needles, in a 2×2 rib pattern, to give it a slight elasticity. Everyone who saw me knitting thought for sure it wouldn’t fit Jay’s head because it looked so small.
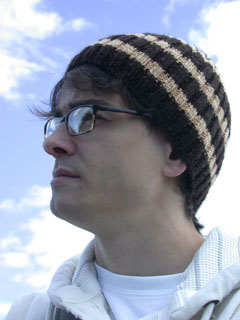 I was right, though. It fit!
It was the first time I made anything in a rib pattern, so I did have a little doubt regarding the fit, but since I made a swatch prior to knitting the hat (yes, I’ve learned my lesson!) I was 99% sure the hat would fit.
After having worn the hat for several weeks, Jay mentioned that the wool hat made his hair a bit oilier than usual. I’m guessing the wool is so untouched by chemicals, it may still be secreting lanolin.
-
Avocado Applications
 The avocado is one of my favorite fruits. Avocado is packed with nutrients such as folate, potassium, vitamin E and lutein. When in season during the summer months, avocados are always on my weekly grocery list.
Guacamole
People seem to think of guacamole everytime an avocado is mentioned. It’s an easy recipe: mash a whole avocado, add a diced tomato, minced small onion, chopped cilantro, squeeze half a lime, salt, pepper and ground cumin. It’s a delicious dip for corn tortillas or served on the side of homemade enchilladas.
Avocado Spa
Avocado can be mashed and applied on the skin as a moisturizing mask. Many spas offer this treatment for facials, body rubs and foot massages. Before applying avocado on your face and body, test it first on a small patch on your arm to make sure you are not allergic.
 First Solid Food for Baby
Avocado was the first choice as soon as my baby started craving solid food. It is easily gummed by my toothless tot, and there is hardly any preparation involved. Just cut the fruit in half, remove the pit and spoon it into baby’s eager mouth.
My eight-month old loves avocado so much, she can eat a half of it in one sitting. I keep the other half refrigerated in a resealable container, ready for the next time my baby wants some more. Remember that avocado turns dark if left out, so if you’re not sure whether your baby can finish a half of an avocado, scrape a smaller portion into a bowl and keep the rest refrigerated.
Egg and Avocado Sandwich
aka Green Egg Sandwich1 hardboiled egg, diced
half an avocado, mashed
1 tablespoon mayonnaise
salt and pepper to tasteCombine ingredients above and serve in between toasted bread for a nutritious and delicious lunch. This recipe makes one sandwich.
Planting the Avocado Seed
 I immerse the flat half of the avocado seed in water, pointed end upwards, and set it on a sunny spot in the kitchen. I’ve made the mistake once of setting it outdoors and the squirrels ate it! Change the water every couple of days, and you may be surprised with some sprouts! When the sprouts are well formed, plant in potting soil with the tip of the seed peeking above the soil surface. Put the plant out on a sunny area, perhaps on a spot the squirrels can’t dig up. Keep the soil fairly moist and with good drainage.
Avocado Arts and Crafts
After you’ve mashed, eaten or applied the avocado on your skin, there is one more thing you can do. Turn your avocado skins into shrunken heads!
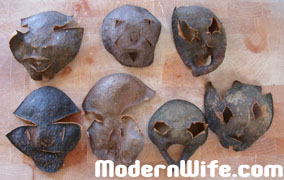
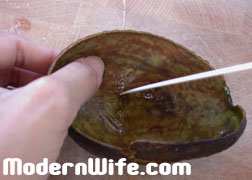 First scrub and wash the inside of the avocado skin until it is clean. Working on a chopping block with the inside of the avocado skin facing you, cut out a couple of eyes, a nose and a mouth. Keep it simple or get creative. Don’t expect it to look like much at first, because the avocado skin needs to dry in the sun for a few days before it shrivels and curls into the gnarly shape of a shrunken head.
If you eat as much avocado as my family does, you’ll have quite a collection of shrunken heads by the end of the summer… just in time for Halloween!
-

Children’s Fairyland
This weekend we went to Children’s Fairyland in Lake Merritt, Oakland, an outdoor amusement park with a fairy tale theme.
Created in 1950, this historic park still has the creepy allure of old-fashioned fairs. Attractions look like they are in need of a new coat of paint. The pen marked “Three Blind Mice” had a guinea pig and the pen that housed the Three Billy Goats Gruff only had two overweight goats when we visited. One of the goats strolled over to us and let us pet him. Our baby was reluctant to pet him, and I appreciated the goat’s kindness and understanding of what the children come out here for, but it still made me feel sad. I imagined the goat having the same low voice as Eeyore, sadly resigning himself to an activity he may not necessarily enjoy, but has learned to put up with.
When my baby wanted to breastfeed, we stopped by the little pond marked “Goosey Goosey Gander,” which housed two ducks. I sat there amused at the sad orchestral music playing, remarking to my husband about how the minor keys were making me feel so sad for the animals. Can you imagine being stuck somewhere and having to put up with sad music all day?
Children’s Fairyland is also home to a sheep, an alpaca and Coco the Pony, who is 34 years old!

All in all, we had a great time at Children’s Fairyland. There are lots of fun places to photograph – a Three Little Pigs roleplaying station, Alice in Wonderland, a Wild West setting – and tiny little houses for children to run around in. I would definitely come back again and support our local amusement park. It’s the only way I know how to make it a better place for my growing child.
-

Zinc Oxide for Diaper Rash
Along the lines of caring for our baby the best way we know how is the treatment of diaper rash. No matter how careful or diligent a parent one is, there is no avoiding an incident or two of baby developing diaper rash. Perhaps it’s an allergic reaction to something baby ate, or a soiled diaper unchanged while traveling. Early on when we were experimenting with different brands of disposable diapers, we discarded certain brands that irritated our baby’s bottom into a rash.
At the same time that we were searching for better brands of diapers, we were also looking at diaper rash ointments. The most popular one is Desitin, an over the counter zinc oxide ointment that can be found at any local drug store. I read all the ingredients, and did not find the inactive ingredients very appealing, particularly the petroleum base. It seems counteractive to have a known allergen and skin irritant as the base of an ointment that’s supposed to treat a diaper rash.
Luckily I found a product from the Self Health Resource Center, a company reputed to provide pure and petroleum-free products. It is labeled as Deodorant, but it is simply zinc oxide in powder form inside a plastic container. I just add water and shake it. Whatever cream winds up on the cap of the container, I dip my finger on and apply on my baby’s rash. It is so amazingly effective. Overnight, the rash is gone. If it’s a really bad rash, it peels the next day, then disappears shortly.
It is also very cheap. I still haven’t finished the original container I bought in the very beginning, and my baby’s almost a year old. The zinc oxide cream dries up after a while, so I just keep adding water, shaking it and using what winds up on the cap.
I wholeheartedly recommend the Deodorant Zinc Oxide for use as a diaper rash cream.
-

My Home Birth Story
October 31 at 9 a.m. my water broke. My midwife, Kristen, came about an hour later to check on me. She suggested going on our daily walk, to help the baby descend lower and bring on the contractions.
So hubby and I went to take a walk, which was the longest walk we’ve ever taken, because I was going so slow. Passing trick-or-treaters on our walk, we rescued a stray dog who almost got run over by a car. Jay whistled to the dog to keep it off the road, until the dog found his way home. We also ate some Mexican food and bought Knudsen’s Recharge, an energy drink that has real fruit juice instead of sugar, for the labor we were anticipating. At the grocery store the cashier asked when I was due, and nearly flipped out when I answered, “Tonight.”
At home, we hung out and every 10 or so minutes I had contractions, which felt like severe menstrual cramps. We went to bed early, Jay massaged my lower back and buttocks everytime I had a contraction. I found it helped me to vocalize while I had a contraction. It helped me breathe through it, and it signaled my husband to massage me. I instructed him to massage my cheeks outward, to help me visualize my body opening up to let the baby out.
By 2 in the morning on November 1, I began feeling more intense contractions, the kind that actually makes me feel like pushing. I fought the urge to push by breathing through it, moaning and vocalizing all the way. I told my husband to call the midwife NOW.
Kristen arrived 2:15 a.m. She set up quickly in our bedroom, and called the other two midwives who will assist her. By that time I was on my hands and knees, the only position I felt comfortable in. Everytime I moaned with my contraction, I remembered the old creation myth about the goddess singing the world into creation, calling each creature by name in a song uniquely its own. The vibration of my voice in my belly helped me get through the pain. In between contractions, I felt delirious, almost like I was in deep dreamy sleep. (Thank you, endorphins!!!)
By 4 a.m. I was getting tired, anxious, and worried that nothing was happening. Kristen and the other midwives kept me hydrated with Recharge and some water, kept encouraging me by saying I’m doing a good job. In between contractions, Kristen checked the baby’s heartbeat through her handheld Doppler, and also checked my cervix. When she felt that the cervix was fully dilated and out of the way, she instructed me to push.
By then my arms were so tired of holding my body on all fours. I had pillows piled up in front of me, to rest my head in between contractions, but my arms and thighs were shaking in exhaustion. Kristen suggested I change position.
I stood up, and in frustration, I cried, “Hold me” to Jay. We hugged, and as I got a contraction I found myself tiptoe-ing and hanging off Jay’s shoulder in one push. He took my weight and it felt really good. I felt the baby go even lower with the help of gravity. Jay and I had found our groove. We repeated this process every contraction. Later on Jay told me he could feel the baby kicking through my belly and onto his stomach as I hung my whole body weight off him – the three of us, father, mother and child moving to the rhythm of our own unique birthing dance. He said that before we labored, he was afraid he wouldn’t know what to do, that he might be in the way of the process, or worse, be like the stereotype “waiting room Dad.” When I hugged him he said he felt like a strong man, that he could support me, not just psychologically but in a very physical sense.
As the baby got lower and lower, I kept crying, “It hurts!” My team encouraged me to keep pushing, make it hurt more, I wasn’t sure I could. I entertained fantasies of being magically transported to the hospital and being shot drugs to make the pain go away.
Kristen brought me back to earth by saying that I was ready to deliver. She suggested I go back to my hands and knees. Jay got back to massaging me to open wide during the contractions. With the most painful pressure on my whole pelvic area, I delivered the head, and the baby got stuck right at the eyes. Jay stretched me wide open to help deliver the baby’s full head at the next contraction. Kristen then expertly repositioned the baby to deliver her shoulders and the rest of the body. At 5:27 a.m. November 1 Kristen placed my baby right underneath me and I looked into my baby’s face for the first time.
It’s a girl! My beautiful baby girl!!!
I hugged her and kissed her. She cried so loud and furiously! She also blew the fluid out of her own nose and mouth. She is so strong! Her APGARS is 9/10. She is 6 lbs 10 oz, 18 inches long.
We were still connected through the umbilical cord, and the placenta was still inside me. I suddenly didn’t feel like I had any more strength to push the placenta out. The midwives encouraged me to breastfeed my baby immediately, to trigger one more contraction so I can deliver the placenta. My baby latched onto my breast immediately. She is so amazingly smart and knew what to do. Within minutes, I passed her on to my husband while I delivered the placenta. Once she was back in my arms, my husband cut the cord, and the midwives set to work inspecting the placenta to make sure there were no missing parts that could still be inside me.
After that, the three midwives split up their afterbirth tasks. Shauna stayed with the baby to measure her weight, length, and reflexes. Kristen sat me in an herbal sitz bath and assisted me in a quick shower, while Colette made us all breakfast.