Author: Modern Wife

  • Learning to Knit

    red scarfI mentioned to my husband once while passing the yarn aisle at a craft store that I had never knitted before. It was more of a wistful sigh than a real wish. At that time I was balancing working at home and taking care of a two-year-old. I had no time to pick up a new hobby.

    Christmas 2006, my husband got me knitting books, various sizes of knitting needles and some yarn. I was so excited! As soon as the holiday season was over, I got to work learning how to knit.

    I was horrible. My swatches looked like a wet hamster. My sweet man and my toddler rescued these unfortunate creations from the trash and wrapped them around naked troll dolls. When I finally got the hang of it, I finished my first knitted piece – a red scarf for the most amazing man in my life.

    I have since learned how to purl, and how to mix knit and purl together to create ribbed, stockinette and every other combination the two could make. It’s been a great year. Here are some of the items I made:
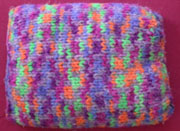
    pompom hatPompom Hat

    Most commercially available yarns have an easy to follow pattern inside the label. This chunky acrylic yarn had a pattern for a pompom hat. I knitted it with straight needles and sewed the seam together all in one night.

    It was really rewarding to have a finished project after just a couple of hours. This was my second knitting project, after the red scarf, and it gave me a chance to practice knit and purl. I also got a lot of compliments from grannies everywhere we went.

    Pompom hats rock!

    space invaders tank top and hatSpace Invaders hat and tank top

    The tank top is from the Mud Flap Girl Tank Top pattern on Stitch ‘n Bitch Nation, page 132, except I replaced the Mud Flap Girl design with the Space Invaders design.

    I used Lion Brand 100% cotton yarn (black) and Lily Sugar ‘n Cream 100% cotton yarn (green) instead of the recommended wool/cotton blend. My swatch calculations were off, so the tank top actually fits too loose on me. I’m not too happy with my ratty crochet edging either, but I learned a lot and had fun, which is all that matters anyway.

    The hat, I just made up as I went along, using the same Space Invaders design and the same 100% cotton yarn. I used straight needles and sewed the seams together.

    orange and green knit bikiniOrange and green bikini

    I made a few tiny modifications to the bikini pattern in Stitch ‘n Bitch: The Knitter’s Handbook, page 224. The yarn the pattern recommends, Classic Elite Star, a 99% cotton and 1% lycra blend, is a discontinued line, so I could only get one skein each of orange and green from Ebay.

    I made the neck straps thicker at 3 stitches, instead of the crocheted chain stitch the pattern called for.

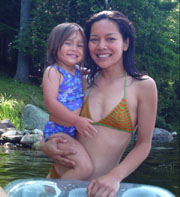
    I wore this bikini swimming all summer and it was great! Unlike nylon or polyester bikinis, this pair absorbed water more, so drying it on a clothesline took slightly longer than drying a synthetic fabric, but not by much. It was definitely dry after hanging it overnight.

    Malaya in black hat with multi-color fuzz

    Black hat with multi-color fuzz

    Shortly after we came to Maine for the summer, I made this hat out of the Lion Brand Mystery yarn, Onyx Prism, which is acrylic and wool in black with multi-color fuzzies randomly interspersed. I did the whole hat in garter stitch, straight needles then sewed the seam. This hat is a lot of fun, almost like a granny hat.

    hamoock pillowHammock Pillow

    Jay wanted a pillow to take with him when he relaxes on the hammock outdoors, so I made him this technicolor hammock pillow with chunky yarn left over from making the pompom hat earlier in the year. Malaya helped me stuff it, and immediately after, wanted a pillow of her own.

    hoppy hoppy the hairy pillow petHoppy Hoppy

    This is just a basic rectangular pillow knitted in Lion Brand Fancy Fur, Stormy Sea, a hairy polyester yarn. After I finished sewing the seams, Malaya helped (over)stuff the pillow and named it “Hoppy Hoppy,” the weasel.

    I love that I can make something as simple and clunky as this hairy pillow and she can turn it into a fantastic creature just by the sheer strength of her imagination. She pets it, hugs it, talks to it and takes it places. It has become her all-time favorite furry pet and I couldn’t be happier!

    space invaders arm warmers
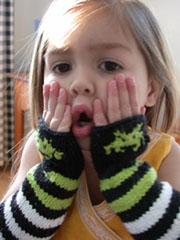
Space Invaders Arm Warmers

    More use for my stash of 100% cotton yarn and the same Space Invaders design pattern from my tank top and hat above.

    I learned how to use double pointed needles on this project. It looks complicated, but once I got one row deep, it all went like clockwork. It’s simple enough to make without a pattern.

    These arm warmers look awesome on her, too. They make her look like a little videogame geek. I love it!

  • A Trip to the Sheep Farm

    A Trip to the Sheep Farm

    Natural Health Supply

    On Open Farm Day, we went to Ellsfarm, a family owned sheep farm in Union, Maine. Their sheep are raised free range, providing healthy dairy products, meat and wool.

    Farmer Perry Ells names her sheep after movie stars. We saw Madeline Khan and Maggie Gyllenhaal; matrilineal succession marked by the same letter of each animal’s first name.

    The sheep were already sheared in the beginning of the summer season, but for the sake of demonstration, Farmer Perry Ells showed us how it is done.

    sheep shearing demonstrationsheep shearing demontrationsheep shearing demonstration

    Nice and cool after being sheared.

    sheep sheared

    ellsfarm wool
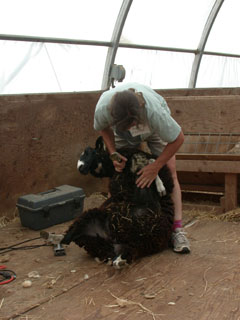
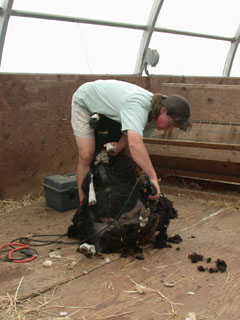
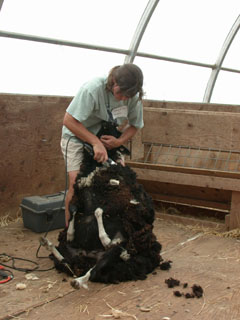
I couldn’t pass up the yarn they had for sale. The wool is raised and spun right there at Ellsfarm. The dark yarn is all natural, no dyes, just bare dark wool straight from the sheep. The light cream colored yarn is dyed with all natural henna. No harsh chemicals or synthetic dyes.

    It was very exciting to have met the sheep that my yarn came from.

    knitting wool yarnThe color scheme matched Jay’s wardrobe perfectly, so I decided I would make him something. Since 100% wool tends to be heavy and itchy I thought something that had limited exposure to bare skin, like a hat, would be best.

    I knitted with double pointed needles, in a 2×2 rib pattern, to give it a slight elasticity. Everyone who saw me knitting thought for sure it wouldn’t fit Jay’s head because it looked so small.

    Jay with his knitted wool hatI was right, though. It fit!

    It was the first time I made anything in a rib pattern, so I did have a little doubt regarding the fit, but since I made a swatch prior to knitting the hat (yes, I’ve learned my lesson!) I was 99% sure the hat would fit.

    After having worn the hat for several weeks, Jay mentioned that the wool hat made his hair a bit oilier than usual. I’m guessing the wool is so untouched by chemicals, it may still be secreting lanolin.

  • Thanksgiving Turkey

    Thanksgiving Turkey

    I finally got me a Mary’s Free Range Heritage Turkey, fed no animal by-products, no preservatives. A true Thanksgiving turkey that’s lived its life healthily with lots of room to run around in. You can really taste the difference between one of these free-range birds and one that’s been farmed pumped with hormones, antibiotics and cooped up in a tiny cage. A free range Heritage Turkey is definitely a celebration of good harvest, abundance and food that warms the heart.

    Roast Turkey Recipe
    (for 8 to 10 lb turkey)

    Brine the Bird: After thawing, rub 2 tablespoons of kosher salt on the inside of the turkey cavity, then rub on the outside with about 1/4 cup of kosher salt. Let it sit in a glass or stainless steel roasting pan. Refrigerate 24 hours before roasting.

    Stuffing Ingredients:
    extra virgin olive oil
    2 celery stalks, chopped
    1 medium carrot, chopped
    1 large onion, chopped
    1 apple, chopped
    1/2 cup walnuts, chopped
    3 cups bread cubes
    1/2 teaspoon salt
    1 teaspoon thyme leaves
    1 teaspoon sage leaves
    ground black pepper to taste
    1/2 cup chicken broth

    Stuffing Directions:
    1. Heat oil to medium low in a large skillet.
    2. Saute celery, onions and carrots until softened, about 10 minutes.
    3. Stir in apples, walnuts, bread cubes and toss lightly.
    4. Sprinkle with all the spices and toss lightly.
    5. Add chicken broth and mix until well blended.
    6. Set aside to cool. Do not stuff turkey until stuffing cools off completely. Filling a turkey with warm stuffing invites bacteria.

    Turkey Roast

    1. Preheat oven to 325 degrees F.
    2. Rinse turkey well and pat dry. Stuff the cavity loosely and skewer
    or string up tight.
    3. Arrange a bed of celery, onion and carrot pieces in a large roasting
    pan. Place the turkey on the vegetables and pour 2 cups of water into
    the pan.
    4. Roast the turkey up to 4 hours, basting with sauce (recipe below) every
    30 minutes. Turkey is done when meat thermometer thrust into the breast
    reads 180 degrees Fahrenheit.
    5. Transfer turkey to a platter and allow to rest for 30 minutes to
    let the juices cook the turkey further.

    Turkey Gravy

    1. While turkey is resting, strain the pan juices into a saucepan.
    Heat to a simmer.
    2. Stir 1/8 cup flour in 1/4 cup water. Add to turkey juices. Let it
    boil, then simmer for 5 more minutes until thick. Season with salt and
    pepper.

    Basting Sauce

    Ingredients:
    8 tablespoons (1 stick) butter, melted
    1/4 teaspoon ground nutmeg
    1/4 teaspoon ground cloves
    1/4 teaspoon paprika
    freshly ground black pepper to taste

    Directions:
    Stir together all the basting sauce ingredients. Brush or baste the
    mixture on turkey every 15 minutes.

    basting a turkey

    Basting keeps the turkey moist as it roasts in the oven and gives the turkey that beautiful glazed crispy skin that graces the Thanksgiving Dinner table.

  • Potty Training

    Potty Training

    Before my baby was born I read about Elimination Communication, a method of detecting and responding to an infant’s elimination needs. It’s not as much “training” as it is becoming in tune with the natural timing of my baby’s body functions. Elimination Communication means teaching children how to eliminate properly right from the start. It’s the opposite of teaching babies to eliminate in their pants, then at a later age having to re-teach them that eliminating in their pants is bad.

    I didn’t launch full steam into EC. I understood the concepts but decided instead to use chlorine free diapers. I remember once holding my baby over the toilet when she was only two weeks old. It was my first try at EC, and I admit it was awkward for me, so I kept using the diapers as I got to know my baby’s signs.

    At around seven months my baby was able to sit upright in a chair, so I resumed the potty training. We set up a Baby Bjorn Toilet Trainer. First thing in the morning, I sat her on the potty and she went. Everytime I would see the “poopie face,” we sat her on the potty and she went. We still continued using diapers, but we sat her on the potty every chance we could get, all the while saying the word “potty” while she sat there.

    Another helpful habit is taking the baby to the bathroom with me whenever I had to go. I wanted her to see that she wasn’t the only one that needed to sit on the potty. I wanted to show her how it’s done.

    The word “potty” became one of the first words she learned how to say. I wanted to make sure she understood that whenever she said the word “potty” I would consistently take her to the toilet. At first she only asked to go potty when she had to take a poop. She was still urinating in her diaper up to about 18 months of age. However, doing away with the messy chore of cleaning diaper poop was a major step in the right direction. Perhaps the sticky gross sensation of pooping was much more noticeable when one has an absorbent diaper quickly soaking up urine.

    Come summertime, my 18 month old spent a lot of time in the inflatable pool in the backyard. We did not bother diapering her, and whenever we did try, she pulled them right off in the heat. Running around the backyard naked, she realized the correlation between the sensation in her bladder and the liquid coming out of her.

    From then on, my toddler consistently called “potty” whenever she had to urinate or defecate, whether we were at home or out and about. We have a potty set up in the car, with plastic bags and paper towels for easy disposal. She learned to sit on a grown-up-sized toilet at public restrooms, holding on to railings or toilet paper holders to steady her. Even in the middle of the night, my toddler wakes and calls “potty” and we take her. Sometimes she’s too groggy, but I can tell she needs to go when she gets restless turning around and around in bed, so I just go and take her to the toilet.

    When I started throwing out dry diapers, I realized she was ready for cotton panties. At 22 months of age, my daughter was fully potty trained. On her 2nd birthday, she went to the bathroom all by herself, closing the door to us and proud to do everything herself.

  • Avocado Applications

    avocado
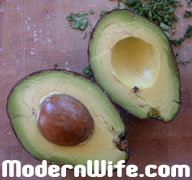
The avocado is one of my favorite fruits. Avocado is packed with nutrients such as folate, potassium, vitamin E and lutein. When in season during the summer months, avocados are always on my weekly grocery list.

    Guacamole

    People seem to think of guacamole everytime an avocado is mentioned. It’s an easy recipe: mash a whole avocado, add a diced tomato, minced small onion, chopped cilantro, squeeze half a lime, salt, pepper and ground cumin. It’s a delicious dip for corn tortillas or served on the side of homemade enchilladas.

    Avocado Spa

    Avocado can be mashed and applied on the skin as a moisturizing mask. Many spas offer this treatment for facials, body rubs and foot massages. Before applying avocado on your face and body, test it first on a small patch on your arm to make sure you are not allergic.

    avocado baby foodFirst Solid Food for Baby

    Avocado was the first choice as soon as my baby started craving solid food. It is easily gummed by my toothless tot, and there is hardly any preparation involved. Just cut the fruit in half, remove the pit and spoon it into baby’s eager mouth.

    My eight-month old loves avocado so much, she can eat a half of it in one sitting. I keep the other half refrigerated in a resealable container, ready for the next time my baby wants some more. Remember that avocado turns dark if left out, so if you’re not sure whether your baby can finish a half of an avocado, scrape a smaller portion into a bowl and keep the rest refrigerated.

    Egg and Avocado Sandwich
    aka Green Egg Sandwich

    1 hardboiled egg, diced
    half an avocado, mashed
    1 tablespoon mayonnaise
    salt and pepper to taste

    Combine ingredients above and serve in between toasted bread for a nutritious and delicious lunch. This recipe makes one sandwich.

    Planting the Avocado Seed

    avocado sproutI immerse the flat half of the avocado seed in water, pointed end upwards, and set it on a sunny spot in the kitchen. I’ve made the mistake once of setting it outdoors and the squirrels ate it! Change the water every couple of days, and you may be surprised with some sprouts! When the sprouts are well formed, plant in potting soil with the tip of the seed peeking above the soil surface. Put the plant out on a sunny area, perhaps on a spot the squirrels can’t dig up. Keep the soil fairly moist and with good drainage.

    Avocado Arts and Crafts

    After you’ve mashed, eaten or applied the avocado on your skin, there is one more thing you can do. Turn your avocado skins into shrunken heads!

    avocado skins arts and crafts
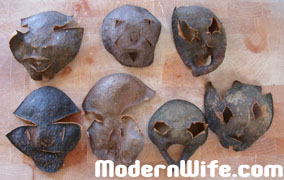
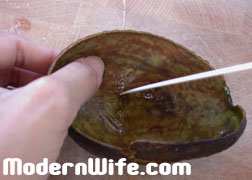
First scrub and wash the inside of the avocado skin until it is clean. Working on a chopping block with the inside of the avocado skin facing you, cut out a couple of eyes, a nose and a mouth. Keep it simple or get creative. Don’t expect it to look like much at first, because the avocado skin needs to dry in the sun for a few days before it shrivels and curls into the gnarly shape of a shrunken head.

    If you eat as much avocado as my family does, you’ll have quite a collection of shrunken heads by the end of the summer… just in time for Halloween!

    avocado shrunken heads

  • Breastfeeding: The Art of Being a Woman

    Breastfeeding is what I’ve found to be the most profound expression of motherhood. Not labor and delivery of the baby, not pregnancy, not conception, all important and indispensable stages of becoming a mother. When I say breastfeeding is the most profound expression of motherhood, it is because I see it as a choice a mother makes that is the ultimate giving of herself. It is a choice that is nowadays not imperative, given the option of bottle feeding formula.

    By breastfeeding, a mother gives her child her time, holding her in her arms and patiently letting her suckle day and night. By breastfeeding, a mother gives her child the nutrients produced by her body, more complete and more pure than anything that can be grown or manufactured on earth. By breastfeeding, a mother teaches her child’s immune system how to defend itself from diseases she has had experience with up to that point.

    I’ve been breastfeeding my baby for almost a year now, and I will continue to do so until she decides to wean herself. I have never been wrong in observing my child closely and allowing her to decide what is best for her. When she’s hungry she eats, when she’s full she pushes food away. I believe that babies are more in touch with the pure and honest needs of their own bodies. As adults we have become too educated and worldly, mired in words and concepts, perhaps not as in touch with what’s basic and real.

    There have been many times when breastfeeding my child constantly is what saves her. I put her at my breast when she’s constipated. It seems to settle her upset tummy and hydrates her till she is able to eliminate. I put her at my breast throughout air flights to and from visiting family. It eases her popping ears and keeps her from being dehydrated in those dry airconditioned airplanes. When she had a fever upon cutting her first tooth, I kept her at my breast with a cool damp washcloth at her forehead. Her fever subsided shortly and she is back to being her healthy and happy self. As a toddler, when she caught pink eye from one of her playmates, a couple of drops of breastmilk into the affected eye cleared the conjunctivitis quickly.

    Breastfeeding has helped me too. I’ve become more confident in my abilities as a mother and a caregiver. I saved money by not buying formula, bottles, and other bottle feeding paraphernalia. Late night feedings are a breeze because all I have to do is turn over to my side and present my breasts.

    I feel really lucky that I am able to stay at home and care for my baby full time the way I do. I understand some women don’t have that luxury. In two-income families, the choice to feed with formula is made for them by the realities of having to leave their child at a day care facility.

    This book, The Womanly Art of Breastfeeding: Completely Revised and Updated 8th Edition, presents as many solutions as there are obstacles preventing contemporary women from breastfeeding their babies. It’s an important book to read during pregnancy, to prepare for the real work ahead.

  • Busting Breastfeeding Myths

    Busting Breastfeeding Myths

    Ever since my baby was born, I’ve heard a number of breastfeeding myths from my mother and some aunts, women whose parenting skills were shaped during the ’70’s, when milk companies took advantage of the women’s liberation movement to sell mothers formula. Here are some of the myths I’ve heard, and the truths that bust these myths:

    MYTH #1: Breastmilk does not have complete nutrition.

    On the contrary, breastmilk has everything a baby needs to grow up strong and healthy. There is no other food or drink grown or manufactured on earth that can compare to the nourishment provided by breastmilk.

    MYTH # 2: There is not enough breast milk to satisfy baby.

    Our breasts make as much milk as our infant requires. Baby’s suckling stimulates the milk ducts, which in turn creates the milk. As baby grows and requires more milk, the supply of milk increases. As baby begins eating solids and weans, the supply of milk adjusts to the decreasing demand. If the natural supply-demand connection between mother and baby is followed, instead of imposing schedules, pumping, or supplementing with formula, there would be less problems with engorgement, clogged milk ducts and leaking.

    MYTH # 3: Mother will wrinkle up and age prematurely if she breastfeeds.

    Premature aging has long been related to dryness of the skin. It is important to keep ourselves hydrated while breastfeeding. Just like when we were pregnant, at least 2 liters of water a day will keep our bodies healthy and our skin glowing. Soups and fruit juices are a wonderful way to hydrate and nourish ourselves.

    Studies show less problems with osteoporosis or calcium deficiencies, less incidences of cancer of the uterus, and less incidences of breast cancer among women who have breastfed on a long-term basis.

    MYTH # 4: Antibodies can only be passed on to baby within the first 6 months.

    Antibodies are constantly being passed on to baby while the breastfeeding connection is kept. That is why experts suggest that breastfeeding continue, even during times when mother has caught a cold or flu. This allows the baby to be exposed to a milder version of the virus and the antibodies to create immunity.

    For more information about breastfeeding, visit What To Expect.

  • Maple Cranberry Sauce

    Maple Cranberry Sauce

    Natural Health Supply

    Ingredients:
    8 oz. cranberries
    1/2 cup sugar
    1/2 cup water
    1/4 cup maple syrup

    Combine all ingredients into a saucepan and bring to a boil under high heat. Turn heat to low and simmer for 15 minutes.

  • Pumpkin Pie

    Pumpkin Pie

    pumpkin pie

    Pumpkin Pie is probably the best thing to do with the pumpkin discarded from making a Jack O’ Lantern. The taste of a pumpkin pie made from fresh pumkin cannot compare to one made from canned pumpkin. Here’s the classic Pumpkin Pie recipe:

    Pie Crust

    Ingredients:
    3 cups pastry flour
    1 cup (2 sticks) butter, softened
    pinch of salt
    1/2 cup iced water

    Mix flour, butter and salt, until mixture is in crumbs. Toss with iced water. Do not overmix. This is enough for a double crust pie or two single-crust pies.

    Pumpkin Pie

    Ingredients:
    1/2 cup brown sugar
    1/2 cup granulated sugar
    2 tablespoons flour
    1/2 teaspoon salt
    2 teaspoons pumpkin pie spice
    1 teaspoon vanilla extract
    3/4 cup pumpkin puree
    2 eggs, separated
    3/4 cup rice milk
    3/4 cup evaporated milk

    Directions:
    1. Stir sugars, flour, salt and spice together.
    2. Add vanilla, pumpkin and egg yolks. Stir until smooth.
    3. Heat the rice milk and evaporated milk until the first bubble, and
    stir into pumpkin mixture.
    4. Beat egg whites until stiff and fold into mixture.
    5. Pour into pie crust.
    6. Bake at 350 degrees F for 15 minutes.
    7. Turn oven to 325 degrees F and bake for 15 minutes longer.

  • Pumpkin Cookies

    Pumpkin Cookies

    This recipe was passed on to us from my husband’s grandmother, who sent us care packages of her special Pumpkin Cookies every Halloween. Mammie used Crisco Oil and it made her cookies very moist and last for weeks. I used organic canola oil as a healthier alternative, and this makes the pumpkin cookies moist, light and fluffy. If you like your cookies crispy on the surface, use butter instead.

    pumpkin cookies

    Mammie’s Pumpkin Cookies

    Ingredients:
    2 cups sugar
    1 cup canola oil (or butter – 2 sticks)
    2 eggs
    2 teaspoons baking soda
    2 teaspoons baking powder
    1 teaspoon salt
    2 teaspoons cinnamon
    2 teaspoons vanilla
    2 tablespoons milk
    1 can pumpkin
    4 cups flour
    1 large bag semi-sweet chocolate chips

    Preheat oven 375 degrees F. Mix well all ingredients, except flour and chocolate chips. Add flour slowly until smooth. Add chocolate chips and mix. Spoon onto greased cookie sheet and bake for 12 to 15 minutes. Take the cookies out as soon as they are showing a bit of brown around the outer edges.