Category: Crafts

  • Girl Power

    Girl Power

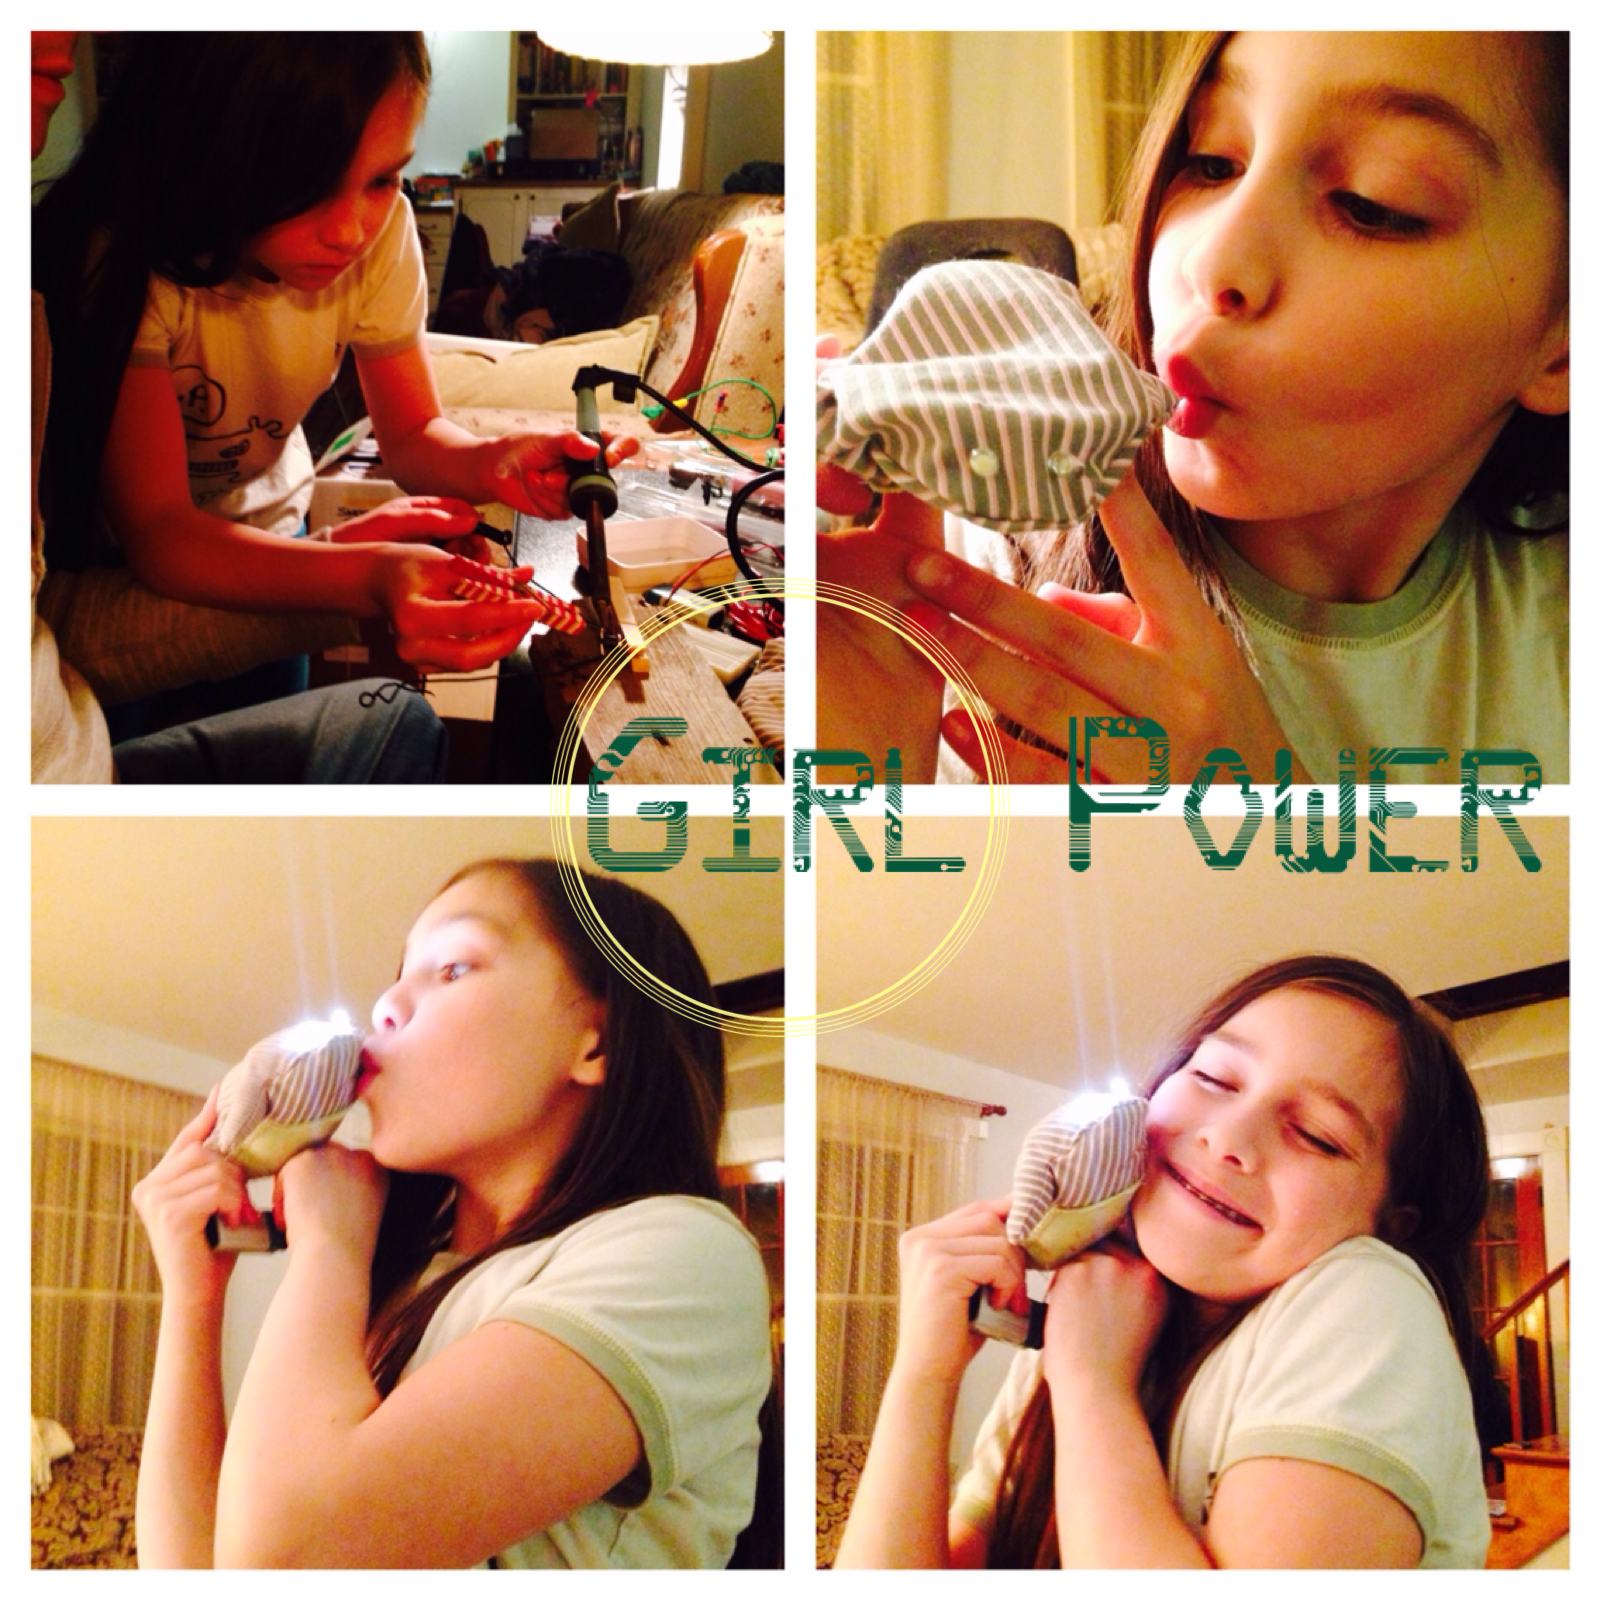
    Two winters ago, my then-9-year-old daughter asked her dad to help her in a big project. She had done electronics in the past, but this was the first time she came up with something to build it into. First they had to make the circuit. It’s a simple circuit, only meant to light up LEDs at the flick of a switch.

    #circuit for #ultraviolet #LED #light. #electronics #girlpower #kids #kidscrafts #maker #crafts

    A photo posted by Malaya (@designcutie) on

    The switch is the trickiest part, since it needed to be soldered and definitely needed to be supervised by a parent.

    #soldering #electronics #switch #kids #kidscrafts #crafts #maker

    A photo posted by Malaya (@designcutie) on

    My daughter drew up a pattern for her plush toy, cut up the fabric and sewed it up on the sewing machine. (I taught her how to use the sewing machine when she was 8. Before that, she’d been hand-sewing since she was 4.) Before stuffing it and while the toy is still inside-out, she and her dad set the wiring up.

    #electronics all wired together into the inside of my #plush #toy – #kidscrafts #kids #crafts #maker

    A photo posted by Malaya (@designcutie) on

    By this time we’d been making toys together for years. She’s an expert stuffing stuffer!

    stuffing the bird. Almost done!

    A photo posted by Malaya (@designcutie) on

    There’s her plush LED nightlight owl! It’s been her reading companion for two years now

    This spring, she wanted to make a companion for her plush owl. This time, building a circuit was a breeze, but using the soldering iron still needs parental supervision.

    #Soldering #electronic parts for Project Patchy Wink. #kidscrafts #girlpower #electronics #maker

    A photo posted by Malaya (@designcutie) on

    Using the sewing machine, however, has become almost second-nature to this budding designer. Like a pro, she drew up a pattern, cut up the fabric, sewed it up, and built her electronic wiring while the toy was still inside-out. Here it is all ready to stuff.

    Project Patchy Wink before stuffing. #LED eyes are in. #electronics #girlpower #maker

    A photo posted by Malaya (@designcutie) on

    And there’s my happy girl with Patchy Wink, her bedtime plush toad with LED light-up eyes. Girl power!

    Get your kids into electronics and making things. It’s a creative, educational and rewarding way to spend time together.

    Girl Power electronic maker of LED nightlight plush toy

  • Sugar Skulls Video

    Sugar Skulls Video

    Happy Halloween and El Dia de los Muertos!

    Here is a short video of me and my Halloween baby making sugar skulls.

  • Lime Candle

    Lime Candle

    I love this! Look at how the light comes prettily through the green lime peel. My daughter came up with this clever little decorating idea of turning lime peels into candles. She must have seen a tutorial on YouTube. The kid loves YouTube tutorials.

    Just clean out the inside part of the peel, leaving the center intact to serve as a wick. Pour a little oil into it. I used safflower oil because that’s what I have here at home. Then light up the wick. It may take a while before it catches a flame. The wick isn’t as dry as a cotton candlewick, so be patient. Once the wick browns it will start to catch a flame.

    Lime Candle

    This would look awesome as a table centerpiece for a romantic candlelit dinner. Valentine’s Day is coming up, and it’s on a Friday! Consider setting your dinner table with one of these. Better yet, float it on a wide vase of water to keep it safe.

    Make lime candles for spring, lemon candles for summer and orange candles for fall.

  • Amigurumi Swampbogger

    Amigurumi Swampbogger

    This past weekend was a crochet fest at our house. I don’t know what came over me. I just suddenly got this urge to find my crochet needles and yarns and make amigurumi, tiny crocheted toys.

    I had a skein of Stitch Nation wool to use up. This yarn is so buttery. I love it!

    I made a swampbogger, one of those American mythological creatures my husband grew up hearing stories about and now as an adult making toys of.

    Pretty soon my 9-year-old daughter was crocheting a white rabbit from a pattern in the book, Kyuuto! Japanese Crafts Amigurumi by Tomoko Takamori. I had to stop every so often to help her. She learned to do the chain stitch at 6 years old, and once in a while pick it up again, learning more along the way. Working with patterns was a really great way to practice her multiplication table.

    I love making amigirumi because of how small these projects are. They’re little one-sitting projects that bring so much joy so instantly. Perfect for kids and busy parents.

  • Duck Tape Gift Ribbon Tutorial

    My 9 year old daughter is a duck tape artist! Here she is demonstrating how to make homemade gift ribbons using duck tape. Top off your Christmas presents with one of these babies. Mama loves them!

  • Cosplay Ears

    Cosplay Ears

    We made a movie! My husband, daughter and I have been making a short movie series since summer last year. My daughter calls it Time Brats. It’s a sci-fi fantasy musical, and she invites her cousins, classmates, and in this latest one, the 4th episode, her 2nd grade teacher, to be part of it. It’s a lot of fun, and keeps me and my husband busy making props and costumes before the shoot, and editing and soundtracking after it. Here’s the video. We had so much fun making it. I hope you like it.

    But that’s not really what this blog post is about. I want to show you how to sew the Chipmunks’ Ears out of scrap fabric we had at home. It’s easy!

    Materials:
    paper for making a pattern
    brown fabric (we used fleece)
    bright colored furry fabric (we had violet at home)
    plastic headband close to the wearer’s hair color
    sewing machine, thread, scissors, pins, thimble, whatever it takes for you to work on a sewing project

    How to Sew Cosplay Ears

    Start by cutting out a pattern. It’s really simple, just a straight line at the bottom and a half circle above. It can be as big or small as you want the ears to be. I imagine making it small would be a lot more difficult, unless you have really tiny fingers, so make it a decent size, maybe half an 8 1/2 by 11 piece of paper.

    How to Sew Cosplay Ears

    When it’s time to cut out the fabric, make sure your fur goes in the direction away from the straight line. I’m not sure I’m describing it accurately so just take a look at the picture above to see what I mean. Cut out 2 sets for 2 ears.

    How to Sew Cosplay Ears

    Put the fabrics together, right sides facing each other, wrong sides on the outside. Tuck the fur in so we don’t sew it and we get more fuzz for fun. Then sew the half-circle around. Don’t worry if you have to make little pleats just to make the two pieces of fabric fit. Just make sure you keep the ends of the straight line bottom together.

    How to Sew Cosplay Ears

    Turn it inside out. See the pleats I did when I sewed the half circle? It looks pretty cool.

    How to Sew Cosplay Ears

    Fold the straight sides in, and sew together.

    How to Sew Cosplay Ears

    Now here’s the tricky part. To get those ears on the headband, you’ll need to hand-sew it on. Fold the ears in half, fur on the inside and set it up straight side in line with the headband, curved side sticking outward like, oh yeah, ears! Hand-sew the ears together to hold on to the headband. You could knock yourself out and sew the whole straight side together, but I just sewed the part close to the fold, and then the ends.

    How to Sew Cosplay Ears

    To really secure the ears to the headband, get into the furry part and sew it together close to the headband. I just did the middle of the ear and it stayed put well enough for two 8-year-olds to wear all day and shake their heads around in.

    Rock those ears, girls!

  • How to Make an Evergreen Wreath the Hard Way

    How to Make an Evergreen Wreath the Hard Way

    Our Christmas tree is up! With the move we were a little worried we wouldn’t get our Christmas tree up in time, but we made it.

    We had to cut off the lowest branches to make our tree fit our stand, so I had a lot of extra branches to make a wreath with. Only I wasn’t planning on making a wreath. I’ve never made a wreath before, and I have no idea where to begin.

    I looked at websites about making a wreath, and of course Martha Stewart had something to say about it too. But I didn’t have any of the fancy wreath forms and I didn’t feel like going out to buy any. (It’s cold out!)

    So here’s my take: How to Make an Evergreen Wreath the Hard Way.

    How to make an evergreen wreath the hard way

    Get those tree loppers, needlenose pliers and some wire. All I had at home was my husband’s sculpting wire. It’s thick and hard to bend, but with leather gloves on I muscled it. First I lopped the branches into smaller twigs. I connected those twigs using the wire, and made a long garland, then turned the garland into a circle and wired it up. I was going to trim it so that it didn’t look so bushy, but then I decided I could only mess it up at this point, so whatevs. I made a loop with the wire, for hanging. And hung up more toys on it, to complement our toy-laden Christmas tree.

    There was still more extra branches so I made a little carpet underneath the fireplace. Our house may still need a lot of work, but it’s warm and it smells like pine. We’re home!

    What to do with Christmas tree trimmings

  • Halloween Invitations

    Halloween Invitations

    Homemade Halloween Invitations

    I wanted to make Halloween party invitations that looked ghostly, so I went for the ancient and distressed look. I got the idea from the Better Homes and Gardens how-to guide.

    We have stacks of manila paper sitting around at home, so I started with that. From the craft store, I bought walnut ink for staining, a spooky stamp, distress stamp pad ink and black ribbon.

    I also downloaded the free Halloween font “Nemo Nightmares” from this free font site. There are so many to choose from. Pick the one that works best with your theme. Type out your invitation on a word processing program. (I used Microsoft Word, then saved it as a PDF.)

    First I prepared for spraying with walnut ink by laying newspaper and scratch paper on my work table. Walnut ink is extremely staining. You wouldn’t want to mess up your table. Test it out on scrap paper first, so you know how far away you ought to be from your paper when spraying. I sprayed one side of my manila paper, let it dry, then sprayed the other side. A little goes a long way.

    Once the stained manila paper is dry on both sides, I ran it through the printer, using the PDF file of my invitation. My PDF file contained 4 invitations on 1 page, so I also used a paper cutter to neatly slice my paper into quarters.

    I used my cat stamp and distress stamp pad ink to put a little design accent on the invitation.

    Once everything was dry, I snipped short lengths of ribbon, rolled up my parchment and tied ribbon around it. Now they look ready for the owl mail.

  • Column of Leaves Scarf

    Column of Leaves Scarf

    My grandmother wearing the column of leaves scarf

    I finished the Column of Leaves Scarf I had been working on over the past month. Just in time for my Grandmother’s 86th birthday celebration. There she is, trying it on, with a beautiful smile on her face.

    She got into a crazy car accident last June during my cousin’s wedding. My grandmother had just gotten off a flight from the Philippines the night before, and she was feeling tired after lunch. She flipped her car into a ditch and was caught in her seatbelt upside down, unable to get out of her car. She honked her horn for help. It was 107 degrees Fahrenheit that day. Someone came up and broke her car window open. She crawled out of the wreck by herself, unscathed, unbroken, and with not even a speck of dirt on her dress. The cops couldn’t believe an 85 year old lady could crawl out of a total wreck without a scratch. They dubbed it “The Miracle on 8 Mile Road.” Words cannot express how so very happy we are that she is alive and well.

    This Column of Leaves pattern by Brooke Nelson is such a good one, and a joy to knit. I still have two skeins each in orange and cranberry of Debbie Bliss Cathay, which is 50% cotton, 35% viscose and 15% silk.

  • Airplane Sock Puppets

    Airplane Sock Puppets

    Any parent traveling with children on a plane stocks up on activities to do while in transit. We certainly had a backpack’s worth of toys, drawing books and art supplies. Most important for parents, however is a creative mind to keep kids entertained during the many hours in limbo.

    On our flight from San Francisco to Manila aboard Philippine Airlines, we received a plastic bag each containing a toothbrush, toothpaste, sleeping mask and a pair of socks. When boredom set in, it was sock puppet time!

    Fold the toe in to make a mouth for the sock puppet. Have your child draw the face using a sharpie marker.

    Playing with sock puppets on the airplane

    Playtime!