Category: Food

  • Chicken Tikka Masala Indian Meal

    Chicken Tikka Masala Indian Meal

    My husband introduced me to Indian food when we first started dating. It was love at first bite. I believe my first was The Clay Oven in Portland, Maine, soon followed by forays into Indian Row in New York City. When we moved to California, we went to Kulbir’s India Palace in Alameda faithfully for over a decade.

    I remember being a new mom, apprehensive because it had been three days and I still didn’t have any breastmilk. My daughter was under a bilirubin light in Children’s Hospital in Oakland. My husband and my parents managed to convince me to take a break and go out to eat. I had a bit of raita and it was like a dam broke. My milk had arrived! From then on, I became a believer in the medicinal power of raita.

    Raita

    Combine 1 cup of whole milk organic plain raw yogurt, 1/2 cup shredded cucumber, 1/2 cup shredded carrots, 2 tablespoons chopped mint or cilantro, and 1 tablespoon freshly squeezed lemon juice. Season with cumin, salt, and pepper. Refrigerate until ready to eat. I usually do this before anything else. The longer it chills, the more the flavors come together.

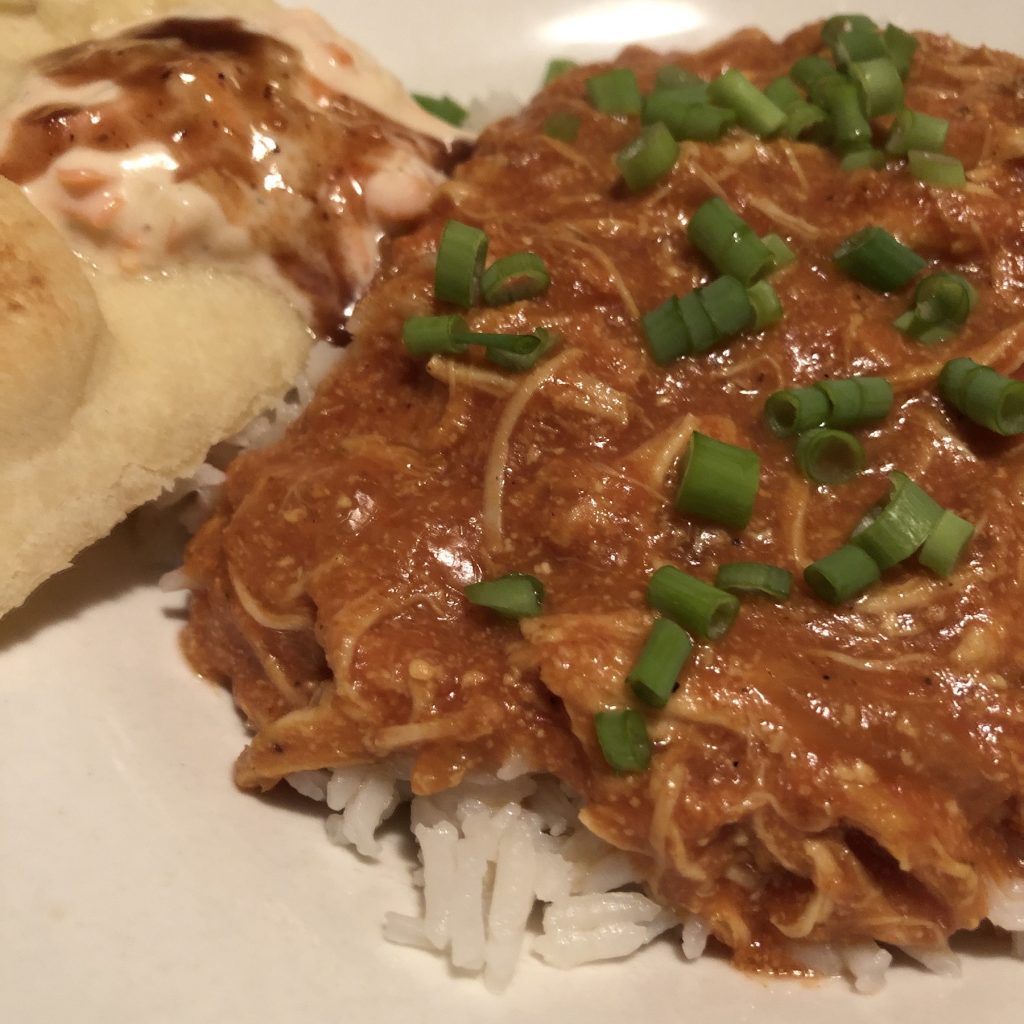
    The entree in this Indian meal is a Western favorite: Chicken Tikka Masala on basmati rice. On the side, we have naan, raita, tamarind chutney, and sweet mango chutney.

    We are lucky to have naan in our grocery store. If you don’t, there are easy recipes online for making it from scratch. Last resort, you could always get it at Amazon. Also in our grocery store ethnic aisle are tamarind chutney and sweet mango chutney. They also have hot mango chutney, but the sweet mango chutney has enough spice to make me happy. The tamarind chutney comes in a concentrated paste that needs to be diluted and sugared to taste.

    I start the Chicken Tikka Masala in a crockpot early in the day. Believe me it’s worth it.

    Chicken Tikka Masala

    Ingredients:
    1 pound organic chicken tenders
    15 oz organic tomato sauce
    1 medium onion, minced
    1 tablespoon fresh ginger, minced
    3 garlic cloves, minced
    1 1/2 teaspoon garam masala
    1 teaspoon ground turmeric
    Pinch cayenne pepper
    Salt and pepper
    1 cup whole milk organic plain raw yogurt
    Green onions or cilantro for garnish

    Combine all ingredients except yogurt in a crockpot. Set on high for 4 hours or low for 8 hours. Ladle a cup of sauce from the crockpot into a medium bowl. Whisk the yogurt into the sauce until smooth. Stir back into the crockpot. Salt and pepper to taste. Serve on a bed of basmati rice and topped with cilantro or green onions.

    Basmati Rice

    Before I add yogurt to the Chicken Tikka Masala pot, I get started on the Basmati Rice to make sure everything is served warm altogether. Melt 1 tablespoon unsalted butter or ghee in a medium saucepan over medium heat. Add 1 1/2 cups basmati rice and stir it about until rice is translucent and slightly toasty, about 5 minutes. Stir in 2 1/4 cups water, 1 teaspoon salt, 1 cinnamon stick, and a bay leaf. Bring to a simmer. Reduce heart to low and cover for about 14 minutes until liquid has been absorbed and rice is tender. Fluff rice with a fork.

    And serve.

    Chicken Tikka Masala on basmati rice with side of naan, raita, tamarind chutney, and mango chutney

  • Giant Puffball Mushroom

    Giant Puffball Mushroom

    Overnight it seemed, these giant puffball mushrooms sprouted in our backyard. We spotted them in autumn last year and let them grow till they popped into greenish brown powdery spores. Cute, then gross. This year, we found a bunch of them in the same spot. I wondered if they were edible. Google said yes. And it has been found to contain a mucoprotein called calvacin, which is a potent antitumor agent, but becomes toxic with prolonged use. Once a year, though, and eating it as close to nature as possible instead of ingesting a distilled version? I’m willing to give it a try.

    So we plucked one out, inspected it to make sure it really was a Calvatia gigantea, and rinsed the dirt off.

    Wash the dirt off the giant puffball mushroom

    Cut off the bottom. This picture shows a couple of the defining characteristics of a Calvatia gigantea: no stem and no gills.

    giant puffball mushrooms have no stem and no gills underneath

    Slice it up. Some people slice off the outer layer and wind up with a block. We just sliced it. As you can see, we picked it early enough in its development stages. The inside is still white and perfect. Do not eat if there are spores.

    slice the giant puffball mushroom

    Store and refrigerate the rest.

    store and refrigerate the giant puffball mushroom

    Some organic extra virgin coconut oil on the cast iron griddle over medium low. Throw in a sliced onion and cook until glassy. I mixed equal parts safflower oil and soy sauce, some salt and pepper to taste, garlic powder, pinch of cayenne, dipped the giant puffball mushroom slice both sides and cooked it.

    cooking the giant puffball mushroom

    Cut it up into strips and serve it up. It would make an amazing addition to stir fry vegetables. The mushroom flavor is subtle and takes on seasonings really well. The texture is soft and smooth against the tongue. I love it!

    stir fry giant puffball mushroom strips

    Also great dipped in a beaten egg and French Toasted.

    dip giant puffball mushroom in egg and cook it

    Gluten-free French Toast Giant Puffball Mushroom with maple syrup drizzled on top and fruit on the side.

    Gluten-free French Toast Giant Puffball Mushroom with maple syrup drizzled on top and fruit on the side

    Have you ever eaten a Giant Puffball Mushroom? Got any recipes to share? Scroll below to comment. Thank you!

  • Cranberry Cheesecake

    Cranberry Cheesecake

    From the moment I took my first ever bite of a cheesecake, I was hooked for life. For the longest time, though, I always bought it, never made it from scratch here at home. It took a friend coming over and making one right in my kitchen before I realized how easy it is. Back then I didn’t even have a KitchenAid Mixer . It was all made with elbow grease. (The trick is to make sure the cream cheese is completely soft.)

    Now that my dear husband bought me one, it’s even easier. Faster. Well, at least the prep is. So tempt your family with this cheesecake recipe if you want them to get you a KitchenAid Mixer for Christmas. It will be worth it, I promise.

    Cranberry Cheesecake

    Ingredients for Cheesecake:
    (Get certified organic ingredients when possible.)
    15 graham crackers, ground
    3 tablespoons butter, melted
    4 packages cream cheese (8 oz each)
    1 1/2 cups sugar
    3/4 cup almond milk
    4 eggs
    1 cup sour cream
    1 tablespoon vanilla
    1/4 cup all-purpose flour

    Preheat the oven to 350 degrees Fahrenheit (175 degrees Celsius). Grease a 9 inch springform pan. Thrifty Tip: I save the wax paper from sticks of butter in the freezer. I use it to grease any and all baking pans.

    In a medium bowl, mix graham cracker crumbs with melted butter and press onto the bottom of the springform pan.

    In the KitchenAid Mixer bowl (or a large bowl), mix cream cheese with sugar until smooth. Add almond milk, eggs one at a time, sour cream, vanilla, and flour. Mix until smooth. Pour this cream cheese mix into springform pan, on top of the graham cracker crust.

    Bake for 1 hour. Turn the oven down to 300 degrees Fahrenheit for the next 30 minutes, then to 250 for another 30 minutes. Turn the oven off but let the cheesecake stand in the oven. Do not take the cheesecake out. Keep the oven door closed while it cools, approximately 5 hours. Once the oven and the cheesecake is cooled completely, take the cheesecake out of the oven and chill in the refrigerator.

    For cranberry topping, use my Maple Cranberry Sauce recipe.

    Cheers to you on this holiday season!

  • Autumn Apple Pie

    Autumn Apple Pie

    This is a basic apple pie recipe that your grandmother likely already has in her recipe box, but here you go. Now you can have this apple pie recipe online as well.

    Apple Pie

    Ingredients: Perfect Pie Crust
    3 cups pastry flour
    1 cup (2 sticks) butter, softened
    pinch of salt
    1/2 cup iced water

    This is my perfect pie crust. I learned how to do it from a vintage recipe when I got married in 1996 and have perfected it all these years. Mix flour, butter and salt, until mixture is in crumbs. Toss with iced water. Do not overmix. Divide pie crust dough into two. Use the wax paper from one of the sticks of butter to grease the pie pan. Roll out one part of the dough and lay in the pie pan. Roll out the second part of the dough and cut out holes to let the steam out.

    Ingredients: Apple Pie Filling
    7 organic apples, peeled and sliced thin
    1/2 cup organic cane sugar
    1/2 cup organic brown sugar
    3 tablespoons organic and unbleached all-purpose flour
    1 teaspoons organic ground cinnamon
    1/4 teaspoon organic ground ginger
    1/4 teaspoon organic ground nutmeg

    Preheat oven at 375 degrees Fahrenheit. Mix all apple pie filling ingredients in a large bowl. Pour into the pie crust bottom already in the pie pan. Cover with the top pie crust. Pinch together and push a non-metal fork’s tines on the edge of the crust. This is a good time to put the assembled apple pie on the Food Zappicator and turn the zapper on to zappicate the pie. Brush whisked organic egg white on the top crust while zappicating. The egg white wash will give the pie a nice golden color once baked in the oven. Bake for 25 minutes. Turn the pie in the oven and bake for another 25 minutes. Cool before serving.

  • Quail Eggs

    Quail Eggs

    Aren’t quail eggs cute? Five of these quail eggs would have the caloric equivalent of one large chicken egg. They’re rich in vitamin A, choline, selenium, and iron. (Source)

    You may encounter raw quail eggs on top of tobiko in fine sushi restaurants. It makes my mouth water just typing those words up.

    I bought mine at my local farmers market. At home, I hardboil them for 3 minutes, peel, and serve with soup. Here’s a quick recipe that is done in minutes. You’ll spend more time peeling those quail eggs than cooking this meal. Ya!

    Noodles with Quail Eggs

    Miso Noodles with Quail Eggs

    Ingredients:
    1 tablespoon dulse
    2 tablespoons miso
    3 cups water
    6 oz. soba noodles
    1 nardello sweet pepper, chopped
    hardboiled quail eggs
    green onion

    Bring water to boil on high heat. Add dulse and miso. Once boiling, add noodles. Cook for 4 minutes. Toss in sweet pepper and quail eggs at the last minute. Serve with green onion garnish. Serves 3.

    Lunchtime!

  • Sriracha Shrimp

    Sriracha Shrimp

    Google sriracha shrimp and you’ll get 20.5 million results. It’s that popular. I think I’ll give some of those recipes a try this winter. I have my own version of Sriracha Shrimp, and I’ll stack mine up against some of the internet’s best reviewed recipes. I’ll have my family vote.

    You can vote, too. Try my recipe below and let me know what you and your family think.

    Sriracha Shrimp

    Ingredients:
    1 cup rice
    1 lb large shrimp, peeled and deveined
    2 tablespoons coconut oil
    1 onion, sliced
    4 cloves garlic, minced
    1 sweet pepper, minced
    1/2 lime
    1 tablespoon sriracha sauce
    1 teaspoon sugar
    1 green onion top, chopped

    Start by cooking rice the way you usually do. Stovetop, steamer, rice cooker, it’s all good.

    While the rice is cooking, melt the coconut oil in a large skillet over medium-low heat. Cook the shrimp until pink, then add onion, garlic, and sweet pepper. While all that is cooking, mix together the lime, sriracha sauce, and sugar until sugar is dissolved. Toss the sauce into the pan with the shrimp combination until well incorporated. Serve on a bed of rice. Garnish with green onions.

    If you think there’s a better Sriracha Shrimp recipe than mine, comment below. I would enjoy trying it.

  • What diet does Hulda Clark recommend?

    What diet does Hulda Clark recommend?

    Although Hulda Clark wrote a lot about food in her books, she did not recommend a particular diet. Whether you are on an omnivorous, vegetarian, vegan, gluten-free, paleo, or any other kind of special diet, you can benefit from Hulda Clark’s lifestyle recommendations.

    Let me simplify the rather dense books she published. Hulda Clark discovered that all diseases have only a combination of two causes: parasites and pollution. The more we avoid parasites and pollution, the healthier we can be.

    We can avoid parasites by washing our produce well. Lugol’s Modified Sodium Iodine can be used as a veggie wash. The Oxygenius Ozonator can also be used to purify water for drinking or for soaking fruits and vegetables. Ozone is FDA-approved for killing micro-organisms. For foods that cannot be soaked in water, such as liquids or cooked food, the Food Zappicator emits a positive offset square wave frequency in 1 kHz to shatter micro-organisms to death.

    Pollution in food is not as easy to avoid. Almost everything that is manufactured for mass consumption is tainted with toxic chemicals to some degree. At the very least, the manufacturing machines are greased with petroleum instead of the more expensive food grade oils. Bottles and jars are required by law to be sterilized with a petroleum solvent before food and drinks can be bottled in them. You can thank lobbyists for Big Chemical Companies for that.

    Then there are the ingredients of mass produced food themselves. If the long list of ingredients is populated with chemical names, you can bet it’s more pollution than nutrition. For instance, propylene glycol can be found on the ingredients list of many baked goods available in grocery stores. (Any chemical with “prop” in it means it is petroleum-derived.)

    Hulda Clark’s books go into it in more detail. Try not to get overwhelmed with the amount of information she lays out for you. If you are able to change one habit a week, think how far along you will be in a year… two years… twenty years! That’s how long it has been for me. I came across Hulda Clark’s book, “The Cure For All Diseases,” in 1997 and boy, did it changed my life!

    A few guidelines for food shopping:

    1. Certified Organic. This means the food is as free from toxic chemicals as it can get based on industry standards. For meats, this means the animal is not injected with hormones and antibiotics. This also assumes the fruit and vegetable is non-GMO.
    2. Kosher. This means the food satisfies the strict requirements of Jewish law.
    3. Farmers Markets are an excellent place to buy your food from. Bring home produce with no stickers! And you can talk to the farmers themselves about their process.
    4. Non-GMO.  This means that the food is not genetically modified. It still can have pesticides and other chemicals.

    Eat a variety of foods as close to nature as possible. Avoid processed foods. Use the Hulda Clark Zapper.

    Got any more questions about the Hulda Clark lifestyle? Leave me a comment below. I’ll try my best to answer it as soon as I can.

  • Date Balls

    Date Balls

    Last Christmas, while gathered around the dinner table at Aunt Faye’s, we got talking about Mammy Flanders’ Date Balls. My husband said it was one of his favorite snacks Mammy made. Aunt Faye didn’t like it much, so it was always missing from her dessert spread during the holidays. My husband wanted to have a taste of them again.

    Aunt Faye brought out (gasp) Mammy Flanders’ recipe box, filled with handwritten recipes from several generations back.

    “Here,” she said. “You can take that home and go through it. It’s gotta be in there somewhere.”

    The cousins all looked longingly at Mammy Flanders’ recipe box. I myself was astounded at how easily it was to pry that heirloom recipe box from Aunt Faye’s hands, but she must have known it was in good hands. My husband felt a responsibility to give back to the family, so he transcribed Mammy’s recipes and posted it as an ebook for everyone to enjoy.

    Since then we’ve been going through the recipes one by one and trying them out. Give this one a try.

    Date Balls

    Ingredients:
    1/4 cup butter
    1 cup sugar
    2 eggs
    1 teaspoon vanilla
    ¼ teaspoon salt
    1 ½ cup ground dates
    3 cups rice crispies

    Cook all ingredients except rice crispies in frying pan over high heat for 10 minutes, stirring constantly to keep from burning. Remove from heat, then add the rice crispies and mix well. Once cool enough to touch, form into tight balls and roll in shredded coconut.

    Enjoy!

  • Coconut Quinoa Cereal

    Coconut Quinoa Cereal

    You might be surprised by how delicious and filling this Coconut Quinoa Cereal is, while being quite possibly the healthiest breakfast on the planet. Let’s look at the ingredients.

    Quinoa is a versatile whole grain that can be made into a salad, a lunch casserole, or a dinner side.

    Quinoa is gluten-free, high in protein, and one of the few plant foods that contain all nine essential amino acids. It is also high in fiber, magnesium, B-vitamins, iron, potassium, calcium, phosphorus, vitamin E and various beneficial antioxidants.

    11 Proven Health Benefits of Quinoa
    Authority Nutrition

    Coconut milk is no slouch either. Coconut milk improves heart health, builds muscle, helps lose fat, prevents fatigue, stimulates digestion, relieves constipation, manages blood sugar, and prevents anemia, joint inflammation, and ulcers. (Source: Dr. Axe)

    Don’t you feel healthier already? Now go and make this cereal.

    Coconut Quinoa Cereal

    Ingredients:
    1 cup coconut milk
    1/2 cup quinoa
    1/3 cup unsweetened shredded coconut
    Maple syrup or raw honey to taste
    More coconut milk to taste

    Heat the coconut milk until boiling. Add quinoa and cover. Lower heat to simmer until the coconut milk is absorbed but still slightly wet. Mix the shredded coconut in. Serve warm with maple syrup or raw honey and more coconut milk to taste. Makes 2 servings.

    Experiment with some of your favorite toppings. Sliced apples with cinnamon, berries, bananas, nuts. Have a happy healthy start to your day!

  • Pigs in a blanket

    Pigs in a blanket

    This little piggy went to the party. This little piggy went to school. This little piggy was an afternoon snack at home. This little piggy went to gymnastics practice. And this little piggy went wee wee wee all the way in my tummy.

    It’s the middle of winter and these piggies are cold! Make them blankets from scratch! Sure, you can buy prepackaged dough that pops out of a cardboard can, but then you’d be setting yourself up for all kinds of chemical additives and subpar ingredients. Besides, making the dough from scratch is easy and fun. My 11 year-old daughter can do it by herself. Kneading it is the best part. She gets all kung fu about it. You can, too.

    Pigs in a blanket recipe

    Ingredients:
    2 cups organic all-purpose flour
    1/2 teaspoon baking powder
    1 tablespoon sugar
    1 teaspoon salt
    1/2 cup organic safflower oil
    1/2 cup hot water
    30 mini beef franks
    1 egg, beaten
    sesame seeds
    flax seeds

    Preheat oven 375 degrees F. Mix together flour, baking powder, sugar and salt in a medium bowl. Add oil and water. Whisk together until fully incorporated and you see no powdered lumps left. Knead the dough well on a floured surface. Divide the dough in half and roll out the first lump until it’s thin and semi-rectangular. Using a knife or a pizza roller, cut out 15 triangles. Position a mini frank on the wider end of each triangle and roll the dough around the little piggy. Brush with egg and lay on a greased baking sheet. Repeat until there are 30 little piggies in a row. Sprinkle sesame seeds and flax seeds. Bake for 25 minutes or until pastry is golden brown.