Category: Food

  • Blueberry Ice Cream and Sorbet

    Blueberry Ice Cream and Sorbet

    Natural Health Supply

    cuisinart ice cream maker

    There she is! My beautiful red Cuisinart ice cream maker. My mouth is watering just looking at it.

    I made two desserts this weekend: Blueberry Ice Cream and Blueberry Sorbet.

    Ingredients
    Blueberry Sorbet
    1 1/4 cup sugar
    1 cup water
    1 quart blueberries
    4 tbsp fresh lemon juice

    Blueberry Ice Cream
    1 pint blueberries
    3 tbsp fresh lemon juice
    1 cup sugar, divided
    1 cup whole milk
    2 cups heavy cream
    1 tsp vanilla extract

    Follow manufacturer’s instructions on how to prepare your ice cream maker. If making these two desserts one after another, begin with Blueberry Sorbet, to keep the sorbet dairy-free.

    blueberry macerating in lemon juice

    Blueberry Sorbet

    1. Boil sugar and water in a medium saucepan. Reduce heat and simmer without stirring until sugar is completely dissolved. Transfer to a bowl and cool completely.
    2. Macerate the blueberries with lemon juice.
    3. Add blueberry mixture to the sugar/water bowl and let it chill for an hour.
    4. Churn the mixture in an ice cream maker for at least 30 minutes or until thickened into a soft-serve consistency.
    5. Freeze for at least 2 hours if a firmer sorbet is desired.

    Blueberry Ice Cream

    1. Macerate the blueberries with lemon juice and 1/3 cup sugar. Let it sit for 2 hours.
    2. In a medium bowl, whisk together milk and remaining sugar until the sugar is dissolved. Stir in heavy cream and vanilla.
    3. Churn the mixture in an ice cream maker for at least 30 minutes or until thickened into a soft serve consistency.
    4. Add the blueberry mixture during the last 5 minutes of churning.
    5. Freeze for at least 2 hours if a firmer consistency is desired.

    blueberry sorbet used as topping for bread

    My husband wanted to eat his sorbet before it was frozen so he used it as a topping on a slice of my fresh baked bread. It was kind of weird to me, a bit heartier than I like my desserts, but he liked it, so what the hey! I’m happy if he’s happy! 😀

  • Thanksgiving Turkey

    Thanksgiving Turkey

    I finally got me a Mary’s Free Range Heritage Turkey, fed no animal by-products, no preservatives. A true Thanksgiving turkey that’s lived its life healthily with lots of room to run around in. You can really taste the difference between one of these free-range birds and one that’s been farmed pumped with hormones, antibiotics and cooped up in a tiny cage. A free range Heritage Turkey is definitely a celebration of good harvest, abundance and food that warms the heart.

    Roast Turkey Recipe
    (for 8 to 10 lb turkey)

    Brine the Bird: After thawing, rub 2 tablespoons of kosher salt on the inside of the turkey cavity, then rub on the outside with about 1/4 cup of kosher salt. Let it sit in a glass or stainless steel roasting pan. Refrigerate 24 hours before roasting.

    Stuffing Ingredients:
    extra virgin olive oil
    2 celery stalks, chopped
    1 medium carrot, chopped
    1 large onion, chopped
    1 apple, chopped
    1/2 cup walnuts, chopped
    3 cups bread cubes
    1/2 teaspoon salt
    1 teaspoon thyme leaves
    1 teaspoon sage leaves
    ground black pepper to taste
    1/2 cup chicken broth

    Stuffing Directions:
    1. Heat oil to medium low in a large skillet.
    2. Saute celery, onions and carrots until softened, about 10 minutes.
    3. Stir in apples, walnuts, bread cubes and toss lightly.
    4. Sprinkle with all the spices and toss lightly.
    5. Add chicken broth and mix until well blended.
    6. Set aside to cool. Do not stuff turkey until stuffing cools off completely. Filling a turkey with warm stuffing invites bacteria.

    Turkey Roast

    1. Preheat oven to 325 degrees F.
    2. Rinse turkey well and pat dry. Stuff the cavity loosely and skewer
    or string up tight.
    3. Arrange a bed of celery, onion and carrot pieces in a large roasting
    pan. Place the turkey on the vegetables and pour 2 cups of water into
    the pan.
    4. Roast the turkey up to 4 hours, basting with sauce (recipe below) every
    30 minutes. Turkey is done when meat thermometer thrust into the breast
    reads 180 degrees Fahrenheit.
    5. Transfer turkey to a platter and allow to rest for 30 minutes to
    let the juices cook the turkey further.

    Turkey Gravy

    1. While turkey is resting, strain the pan juices into a saucepan.
    Heat to a simmer.
    2. Stir 1/8 cup flour in 1/4 cup water. Add to turkey juices. Let it
    boil, then simmer for 5 more minutes until thick. Season with salt and
    pepper.

    Basting Sauce

    Ingredients:
    8 tablespoons (1 stick) butter, melted
    1/4 teaspoon ground nutmeg
    1/4 teaspoon ground cloves
    1/4 teaspoon paprika
    freshly ground black pepper to taste

    Directions:
    Stir together all the basting sauce ingredients. Brush or baste the
    mixture on turkey every 15 minutes.

    basting a turkey

    Basting keeps the turkey moist as it roasts in the oven and gives the turkey that beautiful glazed crispy skin that graces the Thanksgiving Dinner table.

  • Avocado Applications

    avocado
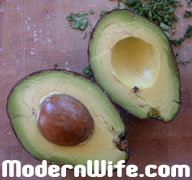
The avocado is one of my favorite fruits. Avocado is packed with nutrients such as folate, potassium, vitamin E and lutein. When in season during the summer months, avocados are always on my weekly grocery list.

    Guacamole

    People seem to think of guacamole everytime an avocado is mentioned. It’s an easy recipe: mash a whole avocado, add a diced tomato, minced small onion, chopped cilantro, squeeze half a lime, salt, pepper and ground cumin. It’s a delicious dip for corn tortillas or served on the side of homemade enchilladas.

    Avocado Spa

    Avocado can be mashed and applied on the skin as a moisturizing mask. Many spas offer this treatment for facials, body rubs and foot massages. Before applying avocado on your face and body, test it first on a small patch on your arm to make sure you are not allergic.

    avocado baby foodFirst Solid Food for Baby

    Avocado was the first choice as soon as my baby started craving solid food. It is easily gummed by my toothless tot, and there is hardly any preparation involved. Just cut the fruit in half, remove the pit and spoon it into baby’s eager mouth.

    My eight-month old loves avocado so much, she can eat a half of it in one sitting. I keep the other half refrigerated in a resealable container, ready for the next time my baby wants some more. Remember that avocado turns dark if left out, so if you’re not sure whether your baby can finish a half of an avocado, scrape a smaller portion into a bowl and keep the rest refrigerated.

    Egg and Avocado Sandwich
    aka Green Egg Sandwich

    1 hardboiled egg, diced
    half an avocado, mashed
    1 tablespoon mayonnaise
    salt and pepper to taste

    Combine ingredients above and serve in between toasted bread for a nutritious and delicious lunch. This recipe makes one sandwich.

    Planting the Avocado Seed

    avocado sproutI immerse the flat half of the avocado seed in water, pointed end upwards, and set it on a sunny spot in the kitchen. I’ve made the mistake once of setting it outdoors and the squirrels ate it! Change the water every couple of days, and you may be surprised with some sprouts! When the sprouts are well formed, plant in potting soil with the tip of the seed peeking above the soil surface. Put the plant out on a sunny area, perhaps on a spot the squirrels can’t dig up. Keep the soil fairly moist and with good drainage.

    Avocado Arts and Crafts

    After you’ve mashed, eaten or applied the avocado on your skin, there is one more thing you can do. Turn your avocado skins into shrunken heads!

    avocado skins arts and crafts
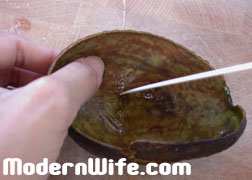
First scrub and wash the inside of the avocado skin until it is clean. Working on a chopping block with the inside of the avocado skin facing you, cut out a couple of eyes, a nose and a mouth. Keep it simple or get creative. Don’t expect it to look like much at first, because the avocado skin needs to dry in the sun for a few days before it shrivels and curls into the gnarly shape of a shrunken head.
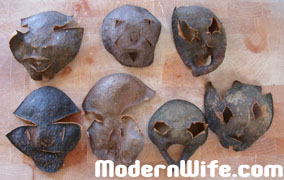
    If you eat as much avocado as my family does, you’ll have quite a collection of shrunken heads by the end of the summer… just in time for Halloween!

    avocado shrunken heads

  • Breastfeeding: The Art of Being a Woman

    Breastfeeding is what I’ve found to be the most profound expression of motherhood. Not labor and delivery of the baby, not pregnancy, not conception, all important and indispensable stages of becoming a mother. When I say breastfeeding is the most profound expression of motherhood, it is because I see it as a choice a mother makes that is the ultimate giving of herself. It is a choice that is nowadays not imperative, given the option of bottle feeding formula.

    By breastfeeding, a mother gives her child her time, holding her in her arms and patiently letting her suckle day and night. By breastfeeding, a mother gives her child the nutrients produced by her body, more complete and more pure than anything that can be grown or manufactured on earth. By breastfeeding, a mother teaches her child’s immune system how to defend itself from diseases she has had experience with up to that point.

    I’ve been breastfeeding my baby for almost a year now, and I will continue to do so until she decides to wean herself. I have never been wrong in observing my child closely and allowing her to decide what is best for her. When she’s hungry she eats, when she’s full she pushes food away. I believe that babies are more in touch with the pure and honest needs of their own bodies. As adults we have become too educated and worldly, mired in words and concepts, perhaps not as in touch with what’s basic and real.

    There have been many times when breastfeeding my child constantly is what saves her. I put her at my breast when she’s constipated. It seems to settle her upset tummy and hydrates her till she is able to eliminate. I put her at my breast throughout air flights to and from visiting family. It eases her popping ears and keeps her from being dehydrated in those dry airconditioned airplanes. When she had a fever upon cutting her first tooth, I kept her at my breast with a cool damp washcloth at her forehead. Her fever subsided shortly and she is back to being her healthy and happy self. As a toddler, when she caught pink eye from one of her playmates, a couple of drops of breastmilk into the affected eye cleared the conjunctivitis quickly.

    Breastfeeding has helped me too. I’ve become more confident in my abilities as a mother and a caregiver. I saved money by not buying formula, bottles, and other bottle feeding paraphernalia. Late night feedings are a breeze because all I have to do is turn over to my side and present my breasts.

    I feel really lucky that I am able to stay at home and care for my baby full time the way I do. I understand some women don’t have that luxury. In two-income families, the choice to feed with formula is made for them by the realities of having to leave their child at a day care facility.

    This book, The Womanly Art of Breastfeeding: Completely Revised and Updated 8th Edition, presents as many solutions as there are obstacles preventing contemporary women from breastfeeding their babies. It’s an important book to read during pregnancy, to prepare for the real work ahead.

  • Busting Breastfeeding Myths

    Busting Breastfeeding Myths

    Ever since my baby was born, I’ve heard a number of breastfeeding myths from my mother and some aunts, women whose parenting skills were shaped during the ’70’s, when milk companies took advantage of the women’s liberation movement to sell mothers formula. Here are some of the myths I’ve heard, and the truths that bust these myths:

    MYTH #1: Breastmilk does not have complete nutrition.

    On the contrary, breastmilk has everything a baby needs to grow up strong and healthy. There is no other food or drink grown or manufactured on earth that can compare to the nourishment provided by breastmilk.

    MYTH # 2: There is not enough breast milk to satisfy baby.

    Our breasts make as much milk as our infant requires. Baby’s suckling stimulates the milk ducts, which in turn creates the milk. As baby grows and requires more milk, the supply of milk increases. As baby begins eating solids and weans, the supply of milk adjusts to the decreasing demand. If the natural supply-demand connection between mother and baby is followed, instead of imposing schedules, pumping, or supplementing with formula, there would be less problems with engorgement, clogged milk ducts and leaking.

    MYTH # 3: Mother will wrinkle up and age prematurely if she breastfeeds.

    Premature aging has long been related to dryness of the skin. It is important to keep ourselves hydrated while breastfeeding. Just like when we were pregnant, at least 2 liters of water a day will keep our bodies healthy and our skin glowing. Soups and fruit juices are a wonderful way to hydrate and nourish ourselves.

    Studies show less problems with osteoporosis or calcium deficiencies, less incidences of cancer of the uterus, and less incidences of breast cancer among women who have breastfed on a long-term basis.

    MYTH # 4: Antibodies can only be passed on to baby within the first 6 months.

    Antibodies are constantly being passed on to baby while the breastfeeding connection is kept. That is why experts suggest that breastfeeding continue, even during times when mother has caught a cold or flu. This allows the baby to be exposed to a milder version of the virus and the antibodies to create immunity.

    For more information about breastfeeding, visit What To Expect.

  • Maple Cranberry Sauce

    Maple Cranberry Sauce

    Natural Health Supply

    Ingredients:
    8 oz. cranberries
    1/2 cup sugar
    1/2 cup water
    1/4 cup maple syrup

    Combine all ingredients into a saucepan and bring to a boil under high heat. Turn heat to low and simmer for 15 minutes.

  • Pumpkin Pie

    Pumpkin Pie

    pumpkin pie

    Pumpkin Pie is probably the best thing to do with the pumpkin discarded from making a Jack O’ Lantern. The taste of a pumpkin pie made from fresh pumkin cannot compare to one made from canned pumpkin. Here’s the classic Pumpkin Pie recipe:

    Pie Crust

    Ingredients:
    3 cups pastry flour
    1 cup (2 sticks) butter, softened
    pinch of salt
    1/2 cup iced water

    Mix flour, butter and salt, until mixture is in crumbs. Toss with iced water. Do not overmix. This is enough for a double crust pie or two single-crust pies.

    Pumpkin Pie

    Ingredients:
    1/2 cup brown sugar
    1/2 cup granulated sugar
    2 tablespoons flour
    1/2 teaspoon salt
    2 teaspoons pumpkin pie spice
    1 teaspoon vanilla extract
    3/4 cup pumpkin puree
    2 eggs, separated
    3/4 cup rice milk
    3/4 cup evaporated milk

    Directions:
    1. Stir sugars, flour, salt and spice together.
    2. Add vanilla, pumpkin and egg yolks. Stir until smooth.
    3. Heat the rice milk and evaporated milk until the first bubble, and
    stir into pumpkin mixture.
    4. Beat egg whites until stiff and fold into mixture.
    5. Pour into pie crust.
    6. Bake at 350 degrees F for 15 minutes.
    7. Turn oven to 325 degrees F and bake for 15 minutes longer.

  • Pumpkin Cookies

    Pumpkin Cookies

    This recipe was passed on to us from my husband’s grandmother, who sent us care packages of her special Pumpkin Cookies every Halloween. Mammie used Crisco Oil and it made her cookies very moist and last for weeks. I used organic canola oil as a healthier alternative, and this makes the pumpkin cookies moist, light and fluffy. If you like your cookies crispy on the surface, use butter instead.

    pumpkin cookies

    Mammie’s Pumpkin Cookies

    Ingredients:
    2 cups sugar
    1 cup canola oil (or butter – 2 sticks)
    2 eggs
    2 teaspoons baking soda
    2 teaspoons baking powder
    1 teaspoon salt
    2 teaspoons cinnamon
    2 teaspoons vanilla
    2 tablespoons milk
    1 can pumpkin
    4 cups flour
    1 large bag semi-sweet chocolate chips

    Preheat oven 375 degrees F. Mix well all ingredients, except flour and chocolate chips. Add flour slowly until smooth. Add chocolate chips and mix. Spoon onto greased cookie sheet and bake for 12 to 15 minutes. Take the cookies out as soon as they are showing a bit of brown around the outer edges.

  • Tabouli

    tabouli ingredientsIngredients:
    1 cup dry bulgur wheat
    1 bunch flat leaf parsley
    1/2 cup fresh mint, chopped
    5 green onions
    5 plum or Roma tomatoes
    1 cucumber
    1 lemon’s juice
    1/2 teaspoon allspice
    salt and pepper
    extra virgin olive oil

    Directions:

    • Soak bulgur wheat in water for 20 minutes, or until bulgur expands and softens.
    • While waiting, chop up the parsley, mint, green onions, tomatoes and cucumber.
    • Mix all ingredients with a wooden spoon. Drizzle some extra virgin olive oil depending on your taste.
    • Chill for at least 2 hours. Overnight is best.

    tabouli recipeServe cold with low fat baked falafel, lightly toasted pita bread, hummus and raw spinach for a refreshingly healthy meal, perfect during the hot summer months. Enjoy!

    super fantastic ultra show podcastThis tabouli recipe is featured on the image-enhanced Super Fantastic Ultra Show Podcast.

  • Low-Fat Baked Falafel Recipe

    Falafel and Tabouli makes for a delicious summer pita
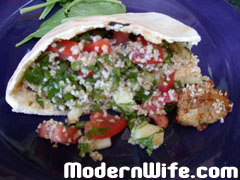
Falafel is conventionally deep fried in oil. I prefer baking it for a lighter, low fat version of this Mediterranean classic.

    Ingredients:
    2 cans garbanzos
    4 cloves garlic, minced
    2 tablespoons peanut butter
    1 green onion, chopped
    1 medium onion, chopped
    1 egg
    1/4 teaspoon cilantro, chopped
    1/4 teaspoon ground cumin
    1/4 teaspoon cayenne pepper
    1 tablespoon soy sauce
    sesame seeds

    Directions:

    1. Preheat oven 400 degrees Fahrenheit.
    2. Mash garbanzos with a mortar and pestle.
    3. Add all the ingredients and mix well with a wooden spoon.
    4. Shape into balls using a dining spoon.
    5. Roll around on sesame seeds, if you have a lot of it; if you have limited sesame seeds, just sprinkle it on top of the falafel ball.
    6. Arrange on a baking sheet and put it in the oven until golden brown, approximately 30 minutes. If falafel is covered in sesame seeds, it may take longer to cook all the way to the center of the falafel, maybe 45 minutes.
    7. Serve with tabouli, lightly toasted pita bread, hummus and raw spinach for a refreshingly healthy meal, perfect during the hot summer months.

    Enjoy!