• Yogurt Face Mask

    Yogurt Face Mask

    The most fabulous beauty products can be found in our very own kitchen pantries. Michelle Pino, Spa Manager at Skana, a luxury spa in Turning Stone Resort Casino in Verona, upstate New York, sent me a few recipes for DIY body products we can whip up easily at home. I tried one of them today.

    Moisturizing Yogurt Face Mask

    DIY Moisturizing Face Mask made from yogurt, raw honey and extra virgin olive oil

    Ingredients:
    2 tablespoons organic plain yogurt
    1 tablespoon raw honey
    1 tablespoon extra virgin olive oil

    DIY Moisturizing Face Mask made from yogurt, raw honey and extra virgin olive oil

    Doesn’t it look so pretty in the bowl? After measuring out the ingredients I couldn’t help but stick the spoon into my mouth. Raw honey from a local beehive helps us develop immunity from local allergens. Yum!

    DIY Moisturizing Face Mask made from yogurt, raw honey and extra virgin olive oil

    Whisk the ingredients together.

    Apply the yummy moisturizing face mask all over clean face and neck. Leave the mask on for 10 to 15 minutes. Resist the urge to lick it off your face. Don’t be like me.

    Then rinse. It was still pretty sticky while I was rinsing with water. I had good results with gently dabbing a paper towel on my face to help get rid of the sticky mask. I was fine with leaving a little bit of residue on my face, as long as it wasn’t totally embarrassing to go out in public, or getting it all over pillows and stuff.

    My skin feels fabulous! Thanks, Michelle. Michelle enjoys DIY projects, healthy recipes, exercise, and all things related to skin care. If you have any comments or questions, feel free to contact Michelle via email at michellepino@turningstone.com – tell her you learned about her from Modern Wife.

  • Cosplay Ears

    Cosplay Ears

    We made a movie! My husband, daughter and I have been making a short movie series since summer last year. My daughter calls it Time Brats. It’s a sci-fi fantasy musical, and she invites her cousins, classmates, and in this latest one, the 4th episode, her 2nd grade teacher, to be part of it. It’s a lot of fun, and keeps me and my husband busy making props and costumes before the shoot, and editing and soundtracking after it. Here’s the video. We had so much fun making it. I hope you like it.

    But that’s not really what this blog post is about. I want to show you how to sew the Chipmunks’ Ears out of scrap fabric we had at home. It’s easy!

    Materials:
    paper for making a pattern
    brown fabric (we used fleece)
    bright colored furry fabric (we had violet at home)
    plastic headband close to the wearer’s hair color
    sewing machine, thread, scissors, pins, thimble, whatever it takes for you to work on a sewing project

    How to Sew Cosplay Ears

    Start by cutting out a pattern. It’s really simple, just a straight line at the bottom and a half circle above. It can be as big or small as you want the ears to be. I imagine making it small would be a lot more difficult, unless you have really tiny fingers, so make it a decent size, maybe half an 8 1/2 by 11 piece of paper.

    How to Sew Cosplay Ears

    When it’s time to cut out the fabric, make sure your fur goes in the direction away from the straight line. I’m not sure I’m describing it accurately so just take a look at the picture above to see what I mean. Cut out 2 sets for 2 ears.

    How to Sew Cosplay Ears

    Put the fabrics together, right sides facing each other, wrong sides on the outside. Tuck the fur in so we don’t sew it and we get more fuzz for fun. Then sew the half-circle around. Don’t worry if you have to make little pleats just to make the two pieces of fabric fit. Just make sure you keep the ends of the straight line bottom together.

    How to Sew Cosplay Ears

    Turn it inside out. See the pleats I did when I sewed the half circle? It looks pretty cool.

    How to Sew Cosplay Ears

    Fold the straight sides in, and sew together.

    How to Sew Cosplay Ears

    Now here’s the tricky part. To get those ears on the headband, you’ll need to hand-sew it on. Fold the ears in half, fur on the inside and set it up straight side in line with the headband, curved side sticking outward like, oh yeah, ears! Hand-sew the ears together to hold on to the headband. You could knock yourself out and sew the whole straight side together, but I just sewed the part close to the fold, and then the ends.

    How to Sew Cosplay Ears

    To really secure the ears to the headband, get into the furry part and sew it together close to the headband. I just did the middle of the ear and it stayed put well enough for two 8-year-olds to wear all day and shake their heads around in.

    Rock those ears, girls!

  • Happy Mothers Day!

    Happy Mothers Day!

    I got lavender plants for Mothers Day this year.

    Lavender for Mothers Day

    They are absolutely beautiful and smells heavenly.

    Lavender for Mothers Day

    Have a beautiful day!

  • Carrots for Red Highlights in Hair

    Carrots for Red Highlights in Hair

    My husband’s grandmother was an Irish redhead. My husband’s mother had auburn hair. Our daughter’s hair bleached blond under the sun, and darkened as she grew older. She has natural copper  highlights in her hair when the sun hits it. She wanted more of that red to come out. Tonight she showed me a YouTube video of how to use ingredients from our kitchen pantry to enhance the red highlights in her hair. Here’s the video:

    We didn’t have cranberries but we had everything else. So here’s what we whipped up:

    Ingredients:
    3 medium organic carrots, grated
    3 tablespoons organic plain yogurt
    2 tablespoons raw honey

    Other things needed:
    plastic shower cap
    plastic bag to wear over clothing
    paper bag or old newspapers to stand on and catch drippings

    Carrot, Yogurt and Honey brings out red highlights in hair

    Get ready by pulling a plastic bag over clothing and spread paper bag or old newspapers on the floor to catch the drippings. Mix the ingredients together in a bowl. Spread all over hair until it is all soaked and caked.

    Carrot, Yogurt and Honey brings out red highlights in hair

    Put a plastic shower cap over head. Let it sit for at least half an hour. Rinse it out in the kitchen sink so the carrot shavings don’t clog your bathroom drain. Jump in the shower and wash/shampoo hair as usual.

    It really works! I guess I shouldn’t be surprised. Carrots do stain. I’m wondering now if it would be just as effective to juice the carrots and use that instead of grated carrots. It would save us the trouble of picking out little carrot shavings out of hair, which we had to do a lot!

    We’ll try cranberries when they become available in the fall. I bet beets would do the job too.

  • Orange Vinegar Cleaner

    Orange Vinegar Cleaner

    Vinegar is an amazing all-purpose cleaner. It is non-toxic and food-grade, safe for the environment and for the family, even those who have asthma. It’s inexpensive, gentle on hands, and deodorizing. It removes fabric stains, soap scum and mineral buildup. I’ve used it to clean ceramic tile, linoleum, enamel, wood, glass, stainless steel and chrome. The only surface vinegar isn’t recommended for is granite or marble.

    Although the vinegar smell dissipates in minutes, it is really strong while it’s being used. I found many recipes online for making scented vinegar cleaners so I decided to give it a try. It’s really easy!

    Fill a quart-size glass jar with orange peel. Make sure the peels are clean. No need to scrub them or anything; just make sure there are no orange sacs, membranes or seeds getting lost in there. If you don’t have enough to fill a jar yet, freeze it and keep adding to it until it’s packed tight.

    orange peel soaked in vinegar

    When you have enough orange peels to fill the glass jar, pour white distilled vinegar into the jar until it covers the orange peels, not quite to the rim but pretty close. Screw the lid on and store in a cool dark place. I hid mine under the sink. Mark your calendar two weeks from the day the jar was filled.

    After two weeks of soaking orange peel in vinegar, it’s time to get it out. Prepare 3 HDPE 8-oz spray bottles for each quart of vinegar soak you have. Set up a funnel into the first of the spray bottles. Pour the orange vinegar in equal parts into the three spray bottles. Top off with water.

    How to make DIY Orange Vinegar Cleaner

    I added a tiny drop of Orange Extract into each spray bottle to really make the orange scent pop. And voila!

    I made so many of these Orange Vinegar Cleaners that I’m giving away 3 bottles of it to 3 lucky commenters. Just leave a comment below before midnight April 7 to qualify. Good luck!

    More information on Vinegar:
    Vinegar Works Wonders
    1001 Uses for White Distilled Vinegar
    Distilled White Vinegar: A Non-Toxic Cleaner

  • Lettuce Mesclun

    Lettuce Mesclun

    I pinched my first harvest today, and it was the Lettuce Mesclun I received as a gift along with the rest of my order from Botanical Interests.

    I planted the whole package of Lettuce Mesclun on February 17 and started pinching individual leaves about 4 inches long today. Anything smaller is left on the ground so they can grow more. Information on the inside of the seed packet suggested cutting off 2 inches above ground level if I want to harvest whole heads. Whatever is left will grow more from the center.

    Seeds can be sown from as early as 6 weeks before last frost of winter till 2 weeks before first frost in fall. In USDA zone 8 or warmer (which is where I am) I can even sow seeds in fall for a winter harvest. Lettuce can survive in temperatures as low as 20F, though 70F is ideal for seed germination. I have mine planted on the north side of our house, and next to peas, for adequate shade that will protect the leaves from harsh sunlight. Summers are brutal here.

    First Harvest Lettuce Mesclun

    For now, these early harvests are so tender and sweet. I will be planting some more of these before it gets too hot.

  • Alfalfa Sprouts

    Alfalfa Sprouts

    Alfalfa sprouts are so good! We used to  buy them at the grocery store. We’d take this little plastic box home, open it and find alfalfa sprouts that were overpacked and soggy. So during my shopping splurge at Botanical Interests I bought Alfalfa Seeds for sprouting.

    The packet states that alfalfa seeds have the possibility of carrying E. coli and other foodborne bacteria, so the alfalfa seeds must be disinfected with a 2% bleach solution (1 teaspoon bleach to a cup of hot water). I’m not a big fan of bleach, especially when it comes to my food. Last I checked, bleach is toxic. So here’s what I did:

    I put 1 tablespoon alfalfa seeds in a quart mason jar, filled the jar with tap water and then put a 1/4 teaspoon of food-grade Hydrogen Peroxide (I brush my teeth with it too, but don’t try it unless you have absolutely no metal dentistry in your mouth). Let the alfalfa seeds sit disinfecting for 15 minutes. See the bubbles in the picture below? That’s the hydrogen peroxide doing its thing.

    Soak Alfalfa Sprouts in Water and food grade Hydrogen Peroxide

    Then I trapped a mesh net on the mouth of the jar with the band. I used the mesh net that my grocery-bought ginger was packaged in.

    Set up mesh net in Mason Jar lid

    When I poured the hydrogen peroxide water out, the mesh net trapped the alfalfa seeds in the jar. I refilled the jar with tap water poured in through the mesh lid. I let it sit overnight in a dark place.

    First thing the next morning, I poured out the water through the mesh lid, shook the seeds around so that they’re kind of stuck on the inside wall of the jar. I let the jar sit in the dark on its side so the seeds are all spread out instead of stuck together at the bottom of the jar.

    Rinse and repeat. About 3 times a day, I filled the jar with tap water, shook it around, poured the water out and let the alfalfa seeds sit in the dark spread out over the inner wall of the jar.

    Day 2 of Alfalfa Sprouts

    After 2 days the alfalfa seeds were sprouting. I put the jar out to get some sun, still doing the rinse-pour thing 3 times a day. With chlorophyll and the sun the sprouts got little baby green leaves on them. Time to eat!

    Alfalfa Sprouts and Sweet Peppers on Tuna Sandwich

    Why go to all this trouble? Here’s 9 Health Benefits of Alfalfa Sprouts.

  • Carrot Cupcakes

    Carrot Cupcakes

    When my daughter was two we spent the year in Maine. Her Grammy grew a garden and took the wee one out to pick carrots throughout the summer. Grammy has now been dead for two years, but my daughter, now 8, still thinks fondly of her and those freshly picked carrots. So in honor of the coming of spring and of Grammy’s recent birthday, we made Carrot Cupcakes. Happy birthday, Grammy!

    Ingredients:
    2 cups all-purpose flour, unbleached
    2 cups organic sugar
    3 cups shredded organic carrots
    1 teaspoon baking powder
    1 teaspoon baking soda, aluminum-free
    1 teaspoon cinnamon
    1 cup organic canola oil
    4 large eggs, free-range and organic

    Preheat oven to 350 degrees Fahrenheit. Prepare cupcake pan with cupcake liners. Mix all the ingredients together in a large bowl until smooth. Pour into cupcake pan cups only about halfway to 3/4 of the way. Bake for 20 to 25 minutes. Test with a fork and when it comes out clean, the cupcakes are done. Cool completely before frosting.

    Frosting:
    10 oz organic cream cheese
    10 tablespoons organic butter, softened
    3 1/3 teaspoon orange extract
    5 cups organic powdered sugar

    Beat the cream cheese and butter together until creamy. Stir in orange extract and powdered sugar gradually.

  • Garden Update

    Garden Update

    My Shade Garden is coming along nicely. Most of it, at least. I planted early spring plants such as peas, sugar snap peas, broccoli, lettuce, radishes and beets on February 16 and 17.

    Remember those Sugar Snap Peas I got from Botanical Interests that I planted a while back? Here they are now!

    Sugar Snap Peas Sprouted and Growing

    Aren’t they happy?

    The radishes are perking up adorably as well. Here’s one. I love its red stems and heart-shaped leaves.

    Radish sprouts

    I can’t wait to see these underground beauties.

    Radish Seeds from Botanical Interests

    The lettuce, broccoli, spinach and beets have also sprouted, but I’ll wait a little bit until they’re bigger before I take pictures.

    Someone has been messing around in my garden. I don’t know if it’s a bird or a little mammal, but I really need to figure out a way to keep my plants from getting eaten. I have both a cat and a dog, and the neighbors’ cats come over to play too. You’d think we’d keep the rodents and birds in check, but I still see a lot of gopher holes throughout the lawn.

    I was thinking of maybe building some kind of Arduino-powered robot-scarecrow to create a motion-detecting alarm to scare off little creatures. Still tossing around some ideas. Maybe something as simple as solar-powered or wind-powered kinetic sculptures would be sufficient.

    As for the Little Marvel Shelling Peas I had leftover from last year, I wrote about refrigerating them before putting them in the ground. I think I read about it somewhere in an old copy of The Old Farmers Almanac. Well, my peas took a very long time to emerge. The Sugar Snaps were way further along before I saw even just a peep of the peas. I finally saw some of them this weekend.

    Late Bloomers in the Shade, Little Marvel Peas

    What else have I got to report? Remember the rose bushes I pruned and fed banana peels? They are growing so big and beautiful. Here’s Security, the Rose Bush with the killer thorns by my daughter’s window.

    Security, the Rose Bush

    The Olive tree is sprouting shoots at its base.

    Olive Tree sprouting shoots

    I think I may take cuttings this summer and see if we can grow more of this Olive tree that is so rich in symbolism.

    Daughter and Dog under the Olive tree

  • Quinoa Asparagus, Oregano Chicken

    Quinoa Asparagus, Oregano Chicken

    Doesn’t that sound like a martial arts movie with English subtitles? Maybe not.

    How about this one? Vegetarian cook for meat-loving… what rhymes with cook?

    I have a new challenge in the kitchen. I don’t want to eat meat anymore. Why be a vegetarian? I came up with these answers when I was 16, the first time I quit meat.

    1. Meat tastes sweaty. It’s flesh. If we were meant to eat meat, we would enjoy the taste of it raw the way carnivorous animals do. We do so much to make meat palatable – marinades, sauces, spices, rubs – but on its own, meat is gross.
    2. Industrial meat farms are evil. Overcrowded, dirty, drugged and abused animals is where meat comes from. I don’t want to support that evil with my money.
    3. We are what we eat. We eat our food’s life force, its fear, its sadness or its happiness. I have nothing against killing animals for food, just like I have nothing against carnivorous animals. What I care about is that animals lived a full life according to their nature before they are killed for food. Animals I described in #2 above are not the kind of energy I want in me.

    You’re probably thinking, so what? Lots of people are vegetarians and there are a lot of vegetarian recipes online, that’s really not much of a challenge. Well, my husband and my daughter love meat. In fact, the reason I started eating meat again was my baby.

    There we were, Jay and me eating at a sunny diner, when suddenly there was this foreign urge in me to reach a fork out to his plate. “Can I have that sausage patty?” I asked.

    He looked at me funny. I felt funny. It was as if my baby’s little fingers came through my vegetarian belly to grab a bite of that sausage patty. Weird. But I went with it. I ate meat throughout my pregnancy.

    Now it’s 8 years later and I’m quitting meat again, only this time I have to feed two meat-loving freaks in my family too.

    Since I first quit meat, there have been some changes in the meat industry. There are meat farms that raise their animals ethically. I scour grocery labels for the words, “free-range,” “grass-fed,” “free-roaming,” “organic.” It’s important to me that the meat I bring home came from animals who lived happy lives, and that I am supporting farms run by good people.

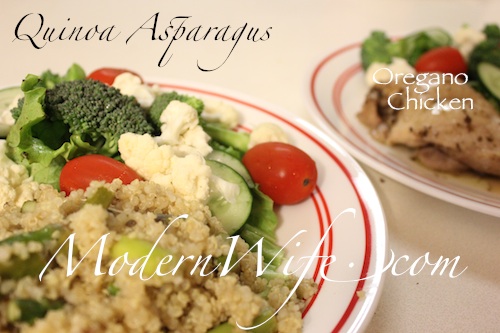
    So here’s what I did for dinner last night. I started out baking Oregano Chicken for the meat freaks. Then I made Quinoa Asparagus for me, and as a side for the chicken. This is like a double protein meal for the meat freaks, because quinoa is rich in protein. Raw salad rounds off the meal.

    Baked Oregano Chicken

    Ingredients:
    1/4 cup organic butter
    Juice of 1/2 a lemon
    2 tablespoons Bragg’s Liquid Aminos
    2 teaspoons dried organic oregano
    1 lb of organic chicken

    Preheat the oven 375F (or 190C).

    Lay those chicken pieces in a baking pan. I used a square glass pyrex pan about 9×9, just enough room to keep the sauce together.

    Melt the butter in a small stainless steel saucepan. Add lemon, Bragg’s Liquid Aminos and oregano. Stir it up, then pour on top of the chicken. Bake for 30 to 45 minutes, until the chicken is cooked through.

    Quinoa Asparagus

    Ingredients:
    4 cups of water
    2 cups quinoa
    2 tablespoons extra virgin organic coconut oil
    1 green onion
    1 bunch organic asparagus
    1 teaspoon oregano
    Juice of 1/2 lemon

    Bring water to a boil, then add quinoa. Cook until the quinoa has absorbed the water.

    While waiting, heat 1 tablespoon coconut oil in a large skillet until it melts in the pan. Add green onions, asparagus, oregano. Sprinkle about a teaspoon of water to steam the asparagus. Cook until asparagus is tender but not mushy. Mix in the quinoa. Squeeze half a lemon, and stir in the remaining 1 tablespoon of coconut oil.

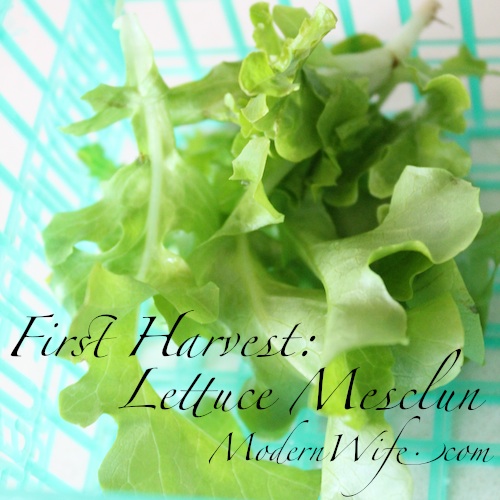
    What’s in my salad? Lettuce, broccoli, cauliflower, cucumber, grape tomatoes. These vegetables taste so good, I don’t dress them at all. That’s right, naked organic vegetables. So good.