Category: Food

  • Organic Easter Eggs

    Organic Easter Eggs

    For weeks now I’ve been walking past grocery aisles seeing brightly colored plastic Easter eggs that pop open to contain candy. We’ve been saving our set year after year, and called it the eco-friendly way because they’re reusable. But a basketful of candy is hardly the celebration of spring I would like to encourage as a healthy family tradition.

    At one point we also brought home an Easter Egg dye kit from the local convenience store. It came with little tablets of dye and a bunch of stickers for decorating hardboiled eggs. Although the package states it’s non-toxic, the list of ingredients contains synthetic chemical dyes that have been found to cause allergies and behavioral problems in children.

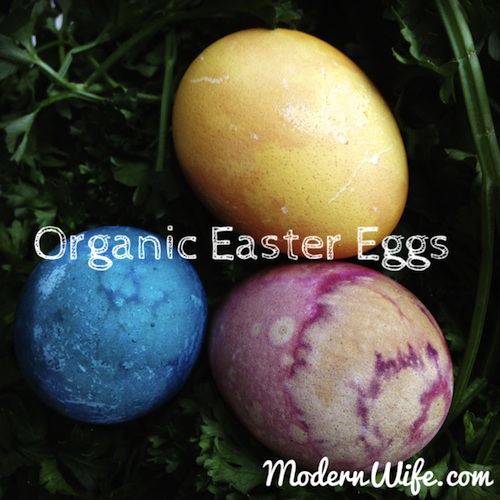
    So this weekend we are starting a new old tradition of making Easter eggs out of vegetables that are naturally staining.

    Like beets!

    Easter Eggs dyed with beets

    And red cabbage!

    Easter Eggs dyed with red cabbage

    And turmeric!

    Easter Eggs dyed with turmeric

    The recipe is easy.

    You need:
    1 tablespoon of distilled white vineger for each cup of water
    white organic eggs

    So if you need 3 cups of water in a saucepan to cover your eggs, then you will need to add 3 tablespoons of vinegar.

    Then chop up and add your staining vegetable of choice. Put them in the vinegar/water combination with the eggs. Bring to a boil, turn off the stove, then cover and let sit for 15 minutes. Transfer the whole soup into a quart mason jar or any quart-sized recycled plastic container you don’t mind getting stained. Some people strain the vegetables out but I decided to keep my vegetables in the soak, in hopes there would be some patterns stamped against the eggs. Let it sit overnight.

    Get the eggs out and let it dry on paper towels or old newspapers. This is how my eggs looked just out of their color soup. Turmeric made yellow, red cabbage made blue, and beets made red.

    Easter Eggs dyed with beets, red cabbage and turmeric

    After they dried, more patterns emerged.

    Easter Eggs dyed with beets, red cabbage and turmeric

    Transfer the dried Easter eggs back into the egg cartons they came in originally. Refrigerate until Easter morning.

    Here are other ways to do this:
    Recipe from Full Circle
    Go Eco when Dyeing Eggs

    Have a great week and an egg-cellent Easter!

  • Guacamole & Salsa

    Guacamole & Salsa

    I make the easiest and most delicious Guacamole & Salsa east of the Mission. Or so I think. Give it a try and see if I’m right.

    Guacamole & Salsa, when made fresh with organic ingredients, are a super healthy combination. Avocado has more than two times the potassium found in a banana, and is rich in the B vitamins, folic acid and vitamin E. Tomatoes contain lycopene, a powerful anti-cancer nutrient. Cilantro is excellent for removing toxic metals such as mercury from the body. Red Bell Peppers are rich in antioxidants, vitamins A, B, C and E, and a number of beneficial minerals.

    Guacamole

    Ingredients:
    2 organic avocadoes
    1 organic tomato, chopped
    a bunch of organic cilantro, chopped
    salt and pepper to taste

    Mash the avocadoes with a fork. Add chopped tomato and cilantro. Salt and pepper to taste. Mix together.

    Salsa

    Ingredients:
    2 organic tomatoes, chopped
    1 teaspoon lemon juice
    1/4 cup organic bell peppers, chopped (I used red in this recipe, but any color will do)
    a bunch of organic cilantro, chopped
    salt and pepper to taste

    Mix all ingredients together. Squeeze a little lemon juice.

    Serve either or both Guacamole & Salsa with organic and/or non-GMO chips, such as Garden of Eatin’ Blue Corn chips, as seen in the photo above. Enjoy the fiesta!

  • Yogurt with Granola Bar

    Yogurt with Granola Bar

    I’ve been buying only organic raw plain whole milk yogurt since last summer. I found some in my local health food store and now I’m hooked. Let me break it down:

    Organic: means the milk comes from cows that are not given antibiotics or hormones, and are fed organic grass and not GMO corn raised on pesticides.

    Raw: means the milk is not pasteurized, fresh as fresh can be right out of healthy cows. It has not sat in a giant vat with who knows how many other cows’ milk to get pasteurized. Also, raw milk still contains the nutrition that is the reason why we drink milk in the first place. (Raw milk is illegal in some states. Because the government wants you to buy their crappy milk.) Here’s more info about real milk.

    Plain: means I don’t have to put up with overly-sugared yogurt from questionable sugar sources. It means I don’t have to eat old fruit that’s sat in that container for who knows how long. I’ll add my own fresh fruit, thank you.

    Whole Milk: means I want the fat. Yes, I do. Real fat, not saturated fat, is good for you.

    I’ve served it with Maple Cranberry Sauce, but mostly I serve it with apple. Here’s the recipe:

    Ingredients:
    organic raw plain whole milk yogurt
    organic apple, peeled and chopped
    organic maple syrup
    Nature’s Path Organic Crunchy Granola Bars, Apple Pie Crunch Chia Plus

    Scoop out yogurt into breakfast bowl. Drizzle maple syrup and top with apple. Finish with granola bars.

    Apple Yogurt with Granola Bars

  • Green Eggs

    Green Eggs

    I started making green eggs when my daughter was a Dr. Seuss-loving toddler. I started out serving it as a sandwich spread, but now that my family is on a gluten-free diet, I serve it with salad. Let’s start with the recipe.

    Green Eggs

    Ingredients:
    1 organic avocado
    2 organic eggs
    salt and pepper to taste

    Boil eggs. For perfect yellow yolks, put eggs in a saucepan and cover with water. Bring to a rolling boil on high then turn the burner off. Let eggs sit in hot water for 15 minutes. Pour out the hot water and replace with cold water. Let it sit for a few minutes, until eggs are cool enough to touch. Peel.

    Mash the avocado, then add eggs cut up roughly with a spoon. Mix together. Salt and pepper to taste.

    Here’s how I serve it nowadays:

    Green Eggs on salad

    Mine, left, on a heap of green salad – spinach, cucumber, red pepper.

    My daughter’s, top, on the side of 9 spinach leaves (for every year of her age), cucumber slices, and 5 tiny bits of red pepper.

    My husband’s, right, no green eggs. Just a salad and slices of deli turkey. He does not like green eggs and ham. He does not like it, Sam-I-am.

  • Peppermint Ice Cream

    Peppermint Ice Cream

    I know it’s cold outside, but when you have leftover peppermint candy cane, something must be done.

    Peppermint Ice Cream
    From The Ciao Bella Book of Gelato and Sorbetto: Bold, Fresh Flavors to Make at Home

    Ingredients:
    2 cups raw organic whole milk
    1 cup raw organic heavy cream
    4 large organic egg yolks
    3/4 cup organic sugar, separated
    1/2 teaspoon peppermint extract
    candy cane, crushed

    Pour milk and cream in a medium saucepan over medium-low heat, stirring occasionally so a skin doesn’t form until tiny bubbles form around the edge and the mixture reaches 170°F.

    In the meantime, whisk egg yolks until smooth. Slowly whisk in 1/2 cup sugar until it becomes a thick pale yellow paste. Slowly pour in the hot milk mixture while whisking continuously. This is important: The milk should not be poured into the egg mixture quickly or you will get scrambled eggs.

    Return the custard to the saucepan and cook over low heat. Stir frequently with a wooden spoon until the custard is thick enough to coat the back of the spoon. Temperature of the custard should reach 185°F. Do not allow the custard to boil.

    Ice Cream Custard

    Pour the custard through a fine mesh strainer into a clean bowl and let it cool to room temperature. Stir the peppermint extract into the custard, then stir every five minutes until cooled completely. Cover and refrigerate overnight.

    Prepare ice cream maker according to manufacturer’s instructions. Churn until thickened into a soft serve consistency. Transfer to an airtight container and freeze until firm.

    Serve with crushed peppermint candy topping.

    It’s like Christmas morning all over again.

  • Honey Lemon Garlic Tea

    Honey Lemon Garlic Tea

    Every year I revisit this recipe, from Dr. Aviva Jill Romm’s book, Vaccinations: A Thoughtful Parent’s Guide: How to Make Safe, Sensible Decisions about the Risks, Benefits, and Alternatives. The recipe is listed as Garlic Lemonade, but I call it Honey Lemon Garlic Tea. Sounds sweeter (trying to just sneak in the “garlic” in there, so it doesn’t turn off my vampire husband and garlic-squeamish kid).

    My daughter has been spending a lot of time outdoors. Recess everyday consists of sled rides down the snowy slope. Last night I heard the beginning of a cough. It sounds dry right now, but I want to nip this cough in the bud. If the cough gets any worse I will have to give her minced half a clove of garlic in honey syrup. Blech! She knows the Honey Lemon Garlic Tea is a more palatable option.

    All three ingredients: honey, lemon and garlic are known to boost the immune system and are particularly awesome at taking care of the respiratory system. Here’s the recipe:

    Garlic Lemonade

    3 medium-sized garlic cloves, chopped
    (blogger’s note: instead of chopping, I pounded the garlic in a mortar and pestle)
    Juice of 1 lemon
    Raw honey to taste.

    Place the garlic in a 1-quart jar and fill the jar with boiling water. Let the garlic steep for 20 minutes and then strain it out. Add the lemon juice and sweeten with raw honey.

    Give 1/2 to 2 cups daily, the lower dose to prevent illness and for younger children and the greater quantity for older kids who feel like they are coming down with a cold.

    Don’t give the lemonade every day; just use it as needed.

    It’s fine to serve it cold in the summertime. But since it’s winter I heat it up to just when it steams (not boiling) and serve warm.

    Previously posted on Garlic Lemonade and Lemon Garlic Tea.

  • Cranberry Mini Tarts

    Cranberry Mini Tarts

    After many years of cooking a whole Thanksgiving dinner and getting my pace and timing down just right, I am taking a break. Tonight will be the first Thanksgiving dinner I will not be cooking. We are going to spend Thanksgiving with my husband’s side of the family, and Aunt Faye will be making us a fantastic old-fashioned Thanksgiving meal.

    Of course, I’m not coming empty-handed. I made these Cranberry Tarts at my daughter’s birthday party recently and they were a hit with everyone. The recipe is gluten-free and nut-free, very important since we have people with gluten and nut sensitivities in the family. I use Namaste Foods Gluten Free Flour Blend.

    Namaste Foods Gluten-Free Flour Blend

    My daughter helped me make these, and it was all we could do to keep ourselves from eating them all up before it’s time to go to Thanksgiving dinner.

    Before beginning, make sure you have the following kitchen tools:
    2 mixing bowls, small or medium
    measuring cups and measuring spoons
    whisk
    wooden spoon
    mini muffin pan
    colander
    oven

    Here we go…

    Cranberry Mini Tarts

    Ingredients for Crust:
    1 1/2 cups Gluten-Free Flour Blend
    3/4 cups organic butter
    6 oz. organic cream cheese

    Ingredients for Filling:
    1/2 cup organic sugar
    1 organic egg
    1/4 cup organic butter
    1 teaspoon organic vanilla extract
    8 oz. fresh cranberries

    Preheat the oven to 325 degrees Fahrenheit. Grease the mini muffin pan with butter wrapper.

    Beat together gluten-free flour, butter and cream cheese until it forms a ball of dough. I don’t have an electric mixer, so I just use a wooden spoon to combine the ingredients, then knead it by hand until it’s a nice smooth consistency.

    Pinch small portions, roll them up in balls, flatten and press evenly into the bottom and sides of mini muffin cups.

    Now we’re ready for the filling. Whisk together sugar, egg, butter and vanilla.

    Wash the fresh cranberries in a colander. Put about 5 cranberries in each mini muffin cup crust. This was like playing mancala.

    Pour a small spoonful of filling over the cranberries in each mini muffin cup crust.

    Cranberry Mini Tarts Before Baking

    Bake for 25 minutes, or until the tarts are golden. Let it cool completely then remove from pan.

    Cranberry Mini Tarts

    Share these treats with your family and friends!

  • Lettuce Mesclun

    Lettuce Mesclun

    I pinched my first harvest today, and it was the Lettuce Mesclun I received as a gift along with the rest of my order from Botanical Interests.

    I planted the whole package of Lettuce Mesclun on February 17 and started pinching individual leaves about 4 inches long today. Anything smaller is left on the ground so they can grow more. Information on the inside of the seed packet suggested cutting off 2 inches above ground level if I want to harvest whole heads. Whatever is left will grow more from the center.

    Seeds can be sown from as early as 6 weeks before last frost of winter till 2 weeks before first frost in fall. In USDA zone 8 or warmer (which is where I am) I can even sow seeds in fall for a winter harvest. Lettuce can survive in temperatures as low as 20F, though 70F is ideal for seed germination. I have mine planted on the north side of our house, and next to peas, for adequate shade that will protect the leaves from harsh sunlight. Summers are brutal here.

    First Harvest Lettuce Mesclun

    For now, these early harvests are so tender and sweet. I will be planting some more of these before it gets too hot.

  • Alfalfa Sprouts

    Alfalfa Sprouts

    Alfalfa sprouts are so good! We used to  buy them at the grocery store. We’d take this little plastic box home, open it and find alfalfa sprouts that were overpacked and soggy. So during my shopping splurge at Botanical Interests I bought Alfalfa Seeds for sprouting.

    The packet states that alfalfa seeds have the possibility of carrying E. coli and other foodborne bacteria, so the alfalfa seeds must be disinfected with a 2% bleach solution (1 teaspoon bleach to a cup of hot water). I’m not a big fan of bleach, especially when it comes to my food. Last I checked, bleach is toxic. So here’s what I did:

    I put 1 tablespoon alfalfa seeds in a quart mason jar, filled the jar with tap water and then put a 1/4 teaspoon of food-grade Hydrogen Peroxide (I brush my teeth with it too, but don’t try it unless you have absolutely no metal dentistry in your mouth). Let the alfalfa seeds sit disinfecting for 15 minutes. See the bubbles in the picture below? That’s the hydrogen peroxide doing its thing.

    Soak Alfalfa Sprouts in Water and food grade Hydrogen Peroxide

    Then I trapped a mesh net on the mouth of the jar with the band. I used the mesh net that my grocery-bought ginger was packaged in.

    Set up mesh net in Mason Jar lid

    When I poured the hydrogen peroxide water out, the mesh net trapped the alfalfa seeds in the jar. I refilled the jar with tap water poured in through the mesh lid. I let it sit overnight in a dark place.

    First thing the next morning, I poured out the water through the mesh lid, shook the seeds around so that they’re kind of stuck on the inside wall of the jar. I let the jar sit in the dark on its side so the seeds are all spread out instead of stuck together at the bottom of the jar.

    Rinse and repeat. About 3 times a day, I filled the jar with tap water, shook it around, poured the water out and let the alfalfa seeds sit in the dark spread out over the inner wall of the jar.

    Day 2 of Alfalfa Sprouts

    After 2 days the alfalfa seeds were sprouting. I put the jar out to get some sun, still doing the rinse-pour thing 3 times a day. With chlorophyll and the sun the sprouts got little baby green leaves on them. Time to eat!

    Alfalfa Sprouts and Sweet Peppers on Tuna Sandwich

    Why go to all this trouble? Here’s 9 Health Benefits of Alfalfa Sprouts.

  • Carrot Cupcakes

    Carrot Cupcakes

    When my daughter was two we spent the year in Maine. Her Grammy grew a garden and took the wee one out to pick carrots throughout the summer. Grammy has now been dead for two years, but my daughter, now 8, still thinks fondly of her and those freshly picked carrots. So in honor of the coming of spring and of Grammy’s recent birthday, we made Carrot Cupcakes. Happy birthday, Grammy!

    Ingredients:
    2 cups all-purpose flour, unbleached
    2 cups organic sugar
    3 cups shredded organic carrots
    1 teaspoon baking powder
    1 teaspoon baking soda, aluminum-free
    1 teaspoon cinnamon
    1 cup organic canola oil
    4 large eggs, free-range and organic

    Preheat oven to 350 degrees Fahrenheit. Prepare cupcake pan with cupcake liners. Mix all the ingredients together in a large bowl until smooth. Pour into cupcake pan cups only about halfway to 3/4 of the way. Bake for 20 to 25 minutes. Test with a fork and when it comes out clean, the cupcakes are done. Cool completely before frosting.

    Frosting:
    10 oz organic cream cheese
    10 tablespoons organic butter, softened
    3 1/3 teaspoon orange extract
    5 cups organic powdered sugar

    Beat the cream cheese and butter together until creamy. Stir in orange extract and powdered sugar gradually.