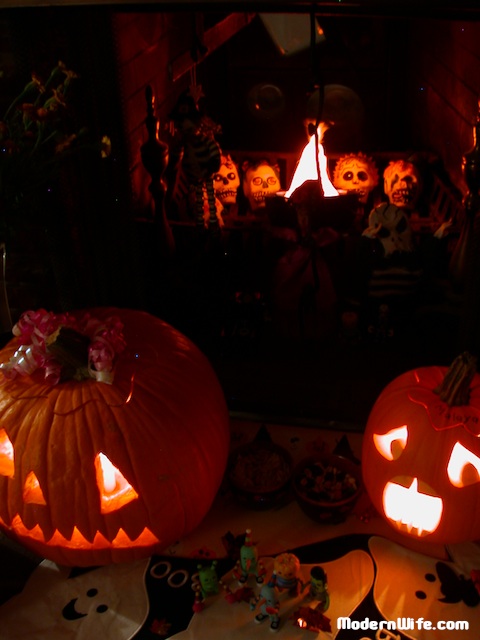
Happy Halloween and El Dia de los Muertos!
Here is a short video of me and my Halloween baby making sugar skulls.

Happy Halloween and El Dia de los Muertos!
Here is a short video of me and my Halloween baby making sugar skulls.
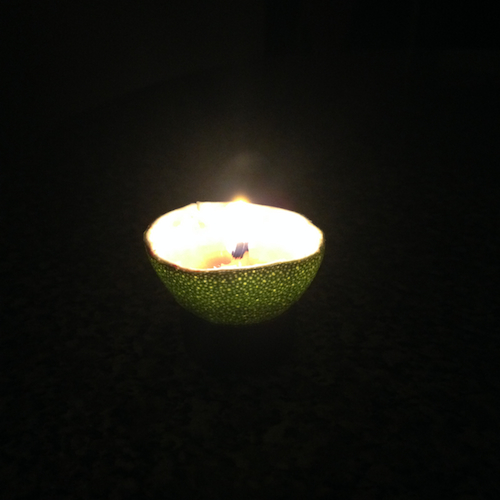
I love this! Look at how the light comes prettily through the green lime peel. My daughter came up with this clever little decorating idea of turning lime peels into candles. She must have seen a tutorial on YouTube. The kid loves YouTube tutorials.
Just clean out the inside part of the peel, leaving the center intact to serve as a wick. Pour a little oil into it. I used safflower oil because that’s what I have here at home. Then light up the wick. It may take a while before it catches a flame. The wick isn’t as dry as a cotton candlewick, so be patient. Once the wick browns it will start to catch a flame.

This would look awesome as a table centerpiece for a romantic candlelit dinner. Valentine’s Day is coming up, and it’s on a Friday! Consider setting your dinner table with one of these. Better yet, float it on a wide vase of water to keep it safe.
Make lime candles for spring, lemon candles for summer and orange candles for fall.

We made a movie! My husband, daughter and I have been making a short movie series since summer last year. My daughter calls it Time Brats. It’s a sci-fi fantasy musical, and she invites her cousins, classmates, and in this latest one, the 4th episode, her 2nd grade teacher, to be part of it. It’s a lot of fun, and keeps me and my husband busy making props and costumes before the shoot, and editing and soundtracking after it. Here’s the video. We had so much fun making it. I hope you like it.
But that’s not really what this blog post is about. I want to show you how to sew the Chipmunks’ Ears out of scrap fabric we had at home. It’s easy!
Materials:
paper for making a pattern
brown fabric (we used fleece)
bright colored furry fabric (we had violet at home)
plastic headband close to the wearer’s hair color
sewing machine, thread, scissors, pins, thimble, whatever it takes for you to work on a sewing project
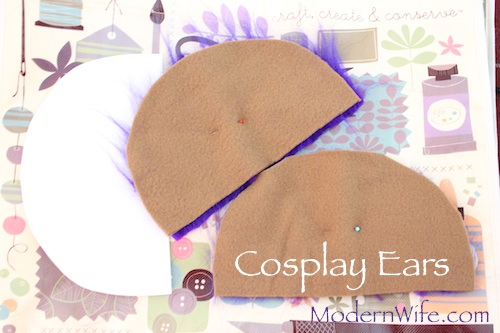
Start by cutting out a pattern. It’s really simple, just a straight line at the bottom and a half circle above. It can be as big or small as you want the ears to be. I imagine making it small would be a lot more difficult, unless you have really tiny fingers, so make it a decent size, maybe half an 8 1/2 by 11 piece of paper.
When it’s time to cut out the fabric, make sure your fur goes in the direction away from the straight line. I’m not sure I’m describing it accurately so just take a look at the picture above to see what I mean. Cut out 2 sets for 2 ears.
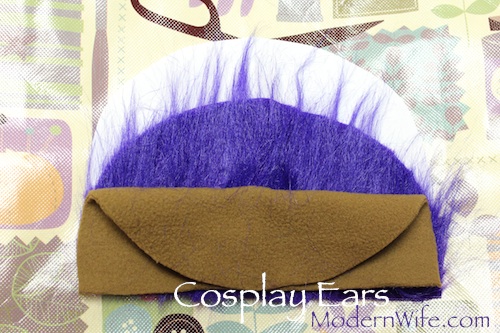
Put the fabrics together, right sides facing each other, wrong sides on the outside. Tuck the fur in so we don’t sew it and we get more fuzz for fun. Then sew the half-circle around. Don’t worry if you have to make little pleats just to make the two pieces of fabric fit. Just make sure you keep the ends of the straight line bottom together.

Turn it inside out. See the pleats I did when I sewed the half circle? It looks pretty cool.
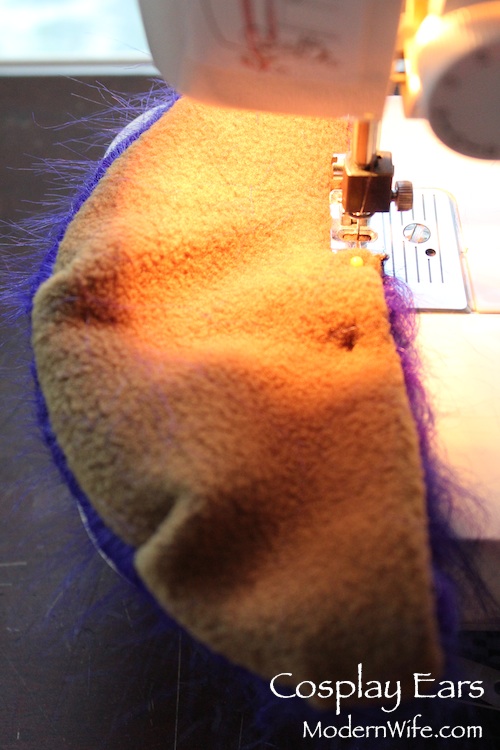
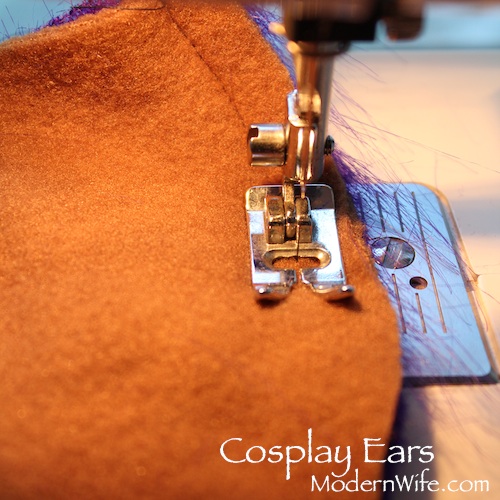
Fold the straight sides in, and sew together.

Now here’s the tricky part. To get those ears on the headband, you’ll need to hand-sew it on. Fold the ears in half, fur on the inside and set it up straight side in line with the headband, curved side sticking outward like, oh yeah, ears! Hand-sew the ears together to hold on to the headband. You could knock yourself out and sew the whole straight side together, but I just sewed the part close to the fold, and then the ends.
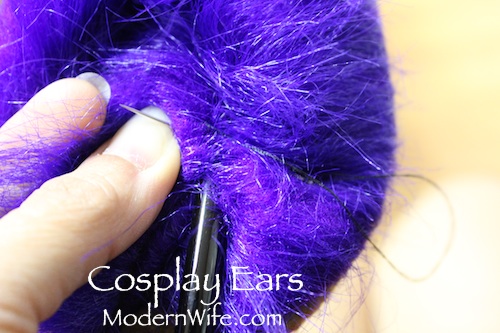
To really secure the ears to the headband, get into the furry part and sew it together close to the headband. I just did the middle of the ear and it stayed put well enough for two 8-year-olds to wear all day and shake their heads around in.
Rock those ears, girls!

As soon as my seeds arrived from Botanical Interests, I sorted them out in order of when they need to be planted. I also included seeds I bought last year, and seeds we’ve been saving all year. I came up with a rough garden plan. It went through several revisions once we started working and sowing in the garden. It’s important to keep track of what was planted where so that next year we can mix it up and make sure each plant gets to know a whole new part of the garden. Keeps the soil healthy and happy.
Shade Garden
First in are all the seeds that love cold weather and would grow with at least 3 hours of sun a day. I picked a spot behind the house. It’s the only shady place on the whole property, and it’s close to a faucet and garden hose. While tilling the soil, we found old rusty nails and parts of rusty tools, an indication that at some point in the distant past, someone had a garden there too.
Advantages of growing these plants in the shade: I don’t have to water as much. The shade keeps the plant bed moist for a longer period of time. The leaves don’t get torched by the sun, especially important to leafy green vegetables such as spinach and lettuce.
What I planted in my Shade Garden: peas, sugar snap peas, spinach, lettuce, radish, beets and broccoli. We’re expecting harvest starting mid-March through the rest of spring.

Herb Garden
Next up are cool season herbs. These herbs like full sun to partial shade, so I’m planning on sowing them in front of the house, which faces south, but is given partial shade by large evergreens. We have raised beds surrounding the house and a couple of small ones in front.
Going in the Early Spring Herb Garden: parsley, cilantro, sage, chamomile, lavender, calendula.
Adding to the Herb Garden after Spring has sprung: thyme, oregano, basil.
Sun Garden
After last chance of Spring frost is over, we’ll be starting the Sun Garden: basil, tomatoes, cherry tomatoes (basil and tomatoes are best companion planting buddies), corn, carrots, cucumber, green beans, zucchini, summer squash, sweet peppers, red bell pepper, watermelon, cantaloupe, and sunflowers.
Pumpkin patch: My daughter is a Halloween baby, so we want our pumpkin patch to be a big celebration. Three different kinds of pumpkins: Jack O’Lantern pumpkins for carving, sugar pie pumpkins for yummy treats and Jack Be Little pumpkins for decorating.

Fruit Trees
I save all seeds from fruit we eat. I’m planning on sprouting these seeds and growing them in pots until they’re big enough to transplant into soil. It could take years, but I have to start sometime. Apricot, different kinds of apples, lemon, cherries, tangerine, plums, pear, pine.
We also have grown trees that are sprouting babies at their roots. Olive and various other evergreens. I wonder if I could grow them from cuttings.
I don’t know if I’ll get to everything. I certainly have a full plate. I’ll be updating these garden plans as we go along. This is going to be an amazing year!


It’s inevitable. Every year my daughter gets the sniffles after Halloween, the effect of a combination of moldy leaves on the ground, sudden cold wet weather, and too much candy.
Garlic Lemonade is my go-to remedy for coughs, cold and the flu. I found the recipe in Dr. Aviva Jill Romm’s book, “Vaccinations: A Thoughtful Parent’s Guide: How to Make Safe, Sensible Decisions about the Risks, Benefits, and Alternatives.” All three ingredients: lemon, garlic and raw honey are great for boosting the immune system. It’s also delicious. My daughter loves it.

Garlic Lemonade
3 medium-sized garlic cloves, chopped
(blogger’s note: instead of chopping, I pounded the garlic in a mortar and pestle)
Juice of 1 lemon
Raw honey to taste.
Place the garlic in a 1-quart jar and fill the jar with boiling water. Let the garlic steep for 20 minutes and then strain it out. Add the lemon juice and sweeten with raw honey.
Give 1/2 to 2 cups daily, the lower dose to prevent illness and for younger children and the greater quantity for older kids who feel like they are coming down with a cold.
Don’t give the lemonade every day; just use it as needed.
Previously posted on Lemon Garlic Tea.
Roasting is my favorite way of making pumpkin puree. Not only is it the easiest way to do it, but oven heat also preserves the pumpkin’s sweet flavor.
A pound is equal to a cup of pumpkin puree. I needed 2 cups of pumpkin puree for my pumpkin cupcake recipe so I picked a 2 pound sugar pumpkin.
Preheat oven to 400 degrees Fahrenheit. Grease a baking sheet with butter. (Money-saving tip: I like saving the wax covers of butter sticks in the freezer. Whenever I need to grease a baking sheet, I get a wax cover out of the freezer and rub it on the baking sheet.)
Cut the pumpkin in half crosswise. Scoop out the seeds and strings. Save the seeds for roasted pumpkin seeds.

Put the pumpkin cut side down on the baking sheet.
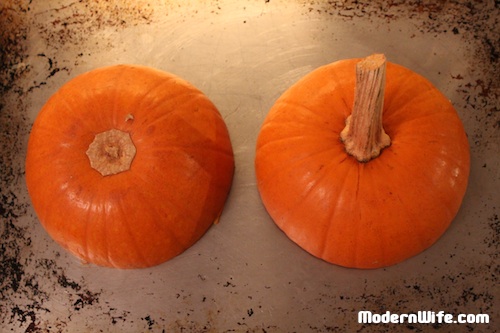
Bake for 45 minutes. Check if skin can be pierced with a fork, then take it out of the oven and cool. Once the pumpkin is completely cooled, you can pull the skin off easily.

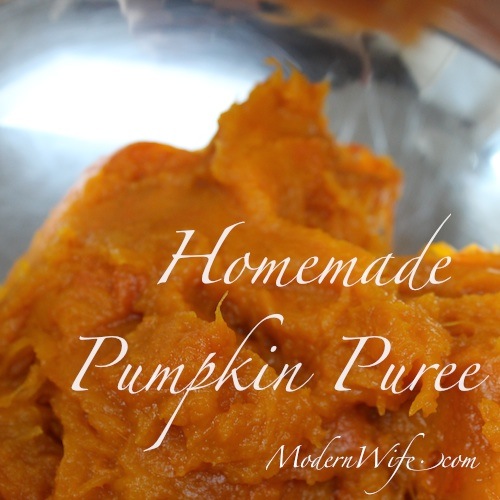
Tadaa! Homemade pumpkin puree!

Now you’re ready to make pumpkin cupcake, or pumpkin cookies, or pumpkin pie or pumpkin ice cream.

Instructions from the book, Halloween Treats: Recipes and Crafts for the Whole Family (Holiday Celebrations) by Donata Maggipinto

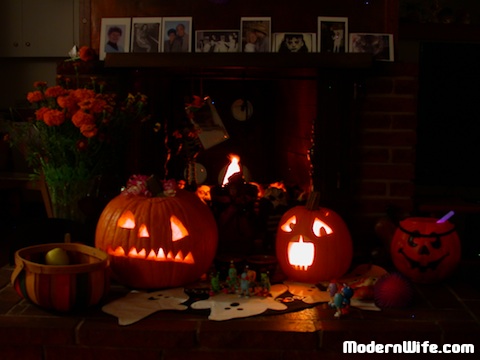
Every year we throw a Halloween party to celebrate my daughter’s birthday. We have a big family with many young cousins, so that alone makes the parties pretty big. In addition, my daughter likes to invite her whole class to the parties as well. Not everyone comes, of course (whew!) but we usually get at least 20 children at these parties.
Children are the most difficult people to keep still long enough to eat. We’ve thrown parties in the past when the kids refused to eat anything and insisted only on playing the whole time they were over. So I’ve decided to serve mostly finger foods, snacks they can swipe as they go past the buffet table on their way to some fun game they are playing. Here is my menu:
Mini Pumpkin Pies. I got the idea from Bakerella’s Pumpkin Pie Bites, but I used my own recipe for Pumpkin Pie. It yielded 48 little pumpkin pies.
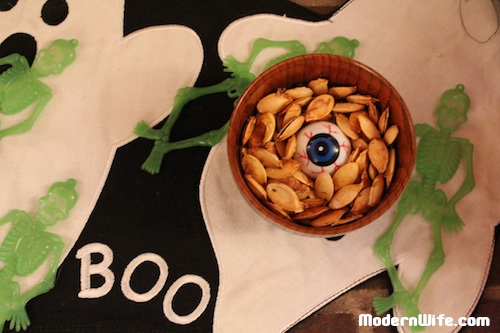
Roasted Pumpkin Seeds. We took the pumpkin seeds from carving out the Jack O’ Lantern and roasted them until brown and crunchy.

Pumpkin Chocolate Chip Cookies. This Pumpkin Chocolate Chip Cookies recipe is a family favorite that has been passed down from generation to generation, tweaked slightly to make it healthier while keeping it just as delicious as ever.
Apples, Apple Cider, Chips with Salsa and Guacamole. We were serving so many sweets so I decided on just having apples, and not caramel candy apples. Chips with Salsa and Guacamole as the savory complement to all the sweet treats. Apple cider for drinks.
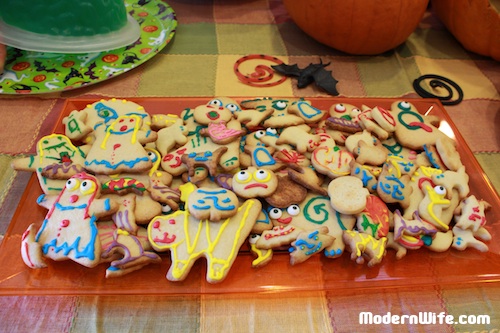
Halloween Sugar Cookies. Halloween cookie cutter shapes + this Butter Cookies recipe + cookie icing = Fun colorful Halloween cookies!
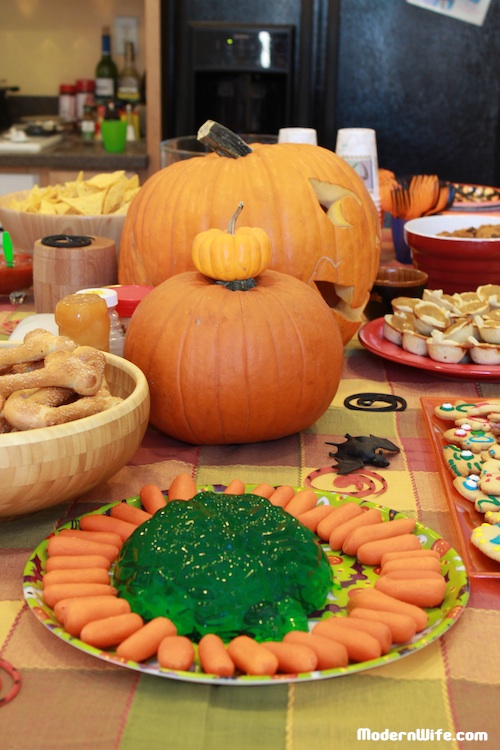
Jello AB Normal Brain. Green jello set in brain mold the night before the party, set up next to cut carrots for a fun color contrast.

Bone Pretzels. I love my breadmaker, and this Breadmaker Pretzel recipe is one of the reasons why.

This recipe was passed on to me from my husband’s grandmother, who sent us care packages of her special Pumpkin Cookies every Halloween. Mammie used Crisco Oil and it made her cookies very moist and last for weeks. I used organic canola oil as a healthier alternative, and this makes the pumpkin cookies moist, light and fluffy. If you like your cookies crispy on the surface, use organic butter instead.
This was previously posted at Pumpkin Cookies, but the way I had written it was confusing. I’ve revised the recipe to make it easier to follow. These Pumpkin Chocolate Chip Cookies have become such a family favorite that I have a feeling I’ll be making several batches of it throughout the holiday season.
Mammie’s Pumpkin Chocolate Chip Cookies
Ingredients:
2 cups organic sugar
1 cup organic canola oil (or softened organic butter – 2 sticks)
2 organic eggs
2 teaspoons organic vanilla
2 tablespoons raw organic milk
1 can organic pumpkin
2 teaspoons baking soda
2 teaspoons baking powder, aluminum-free
1 teaspoon salt
2 teaspoons cinnamon
4 cups organic all-purpose flour
1 large bag semi-sweet organic chocolate chips

Preheat oven 375 degrees F. Whisk sugar, canola oil, eggs, vanilla, milk and pumpkin together until well incorporated.

Add flour, baking soda, baking powder, salt and cinnamon and stir slowly with a spatula or a wooden spoon until smooth. Add chocolate chips and mix.

Spoon rounds onto buttered cookie sheet (use wax paper covers to grease the baking sheet) and bake for 12 to 15 minutes. Take the cookies out as soon as they are showing a bit of brown around the outer edges.


I wanted to make Halloween party invitations that looked ghostly, so I went for the ancient and distressed look. I got the idea from the Better Homes and Gardens how-to guide.
We have stacks of manila paper sitting around at home, so I started with that. From the craft store, I bought walnut ink for staining, a spooky stamp, distress stamp pad ink and black ribbon.
I also downloaded the free Halloween font “Nemo Nightmares” from this free font site. There are so many to choose from. Pick the one that works best with your theme. Type out your invitation on a word processing program. (I used Microsoft Word, then saved it as a PDF.)
First I prepared for spraying with walnut ink by laying newspaper and scratch paper on my work table. Walnut ink is extremely staining. You wouldn’t want to mess up your table. Test it out on scrap paper first, so you know how far away you ought to be from your paper when spraying. I sprayed one side of my manila paper, let it dry, then sprayed the other side. A little goes a long way.
Once the stained manila paper is dry on both sides, I ran it through the printer, using the PDF file of my invitation. My PDF file contained 4 invitations on 1 page, so I also used a paper cutter to neatly slice my paper into quarters.
I used my cat stamp and distress stamp pad ink to put a little design accent on the invitation.
Once everything was dry, I snipped short lengths of ribbon, rolled up my parchment and tied ribbon around it. Now they look ready for the owl mail.
My daughter was born on November 1, and now at kindergarten age she has become very interested in the festival held on her birthday.
El Dia de los Muertos is a 3-day Mexican fiesta to honor the dead. To celebrate, one must prepare an altar, or ofrenda, an offering to one’s dead loved ones. An altar may have flowers, specifically marigold, which is the flowers of the dead, photos of our dead loved ones, food and sugar skulls.
The fiesta begins on October 31, All Hallow’s Eve, also known as Halloween in the United States. All Hallow’s Eve is supposed to be when spirits of dead children roam the earth. At this time toys and candies may be added to the altar.
The dead children’s visit extends overnight into November 1, called All Saints Day, in honor of dead children, innocents who perished before their time. By 3 pm the dead children are supposed to return to the land of the dead, and the adult dead are supposed to take their turn roaming the land of the living.
November 2 is called All Souls Day. This is the day to honor all adult dead loved ones. In the afternoon families visit the cemetery to usher the dead back to the afterlife, to clean graves, offer fresh flowers and reminisce about the loved ones who have died.
El Dia de los Muertos not only pokes fun at mortality, but also sets aside time to remember our dead loved ones.
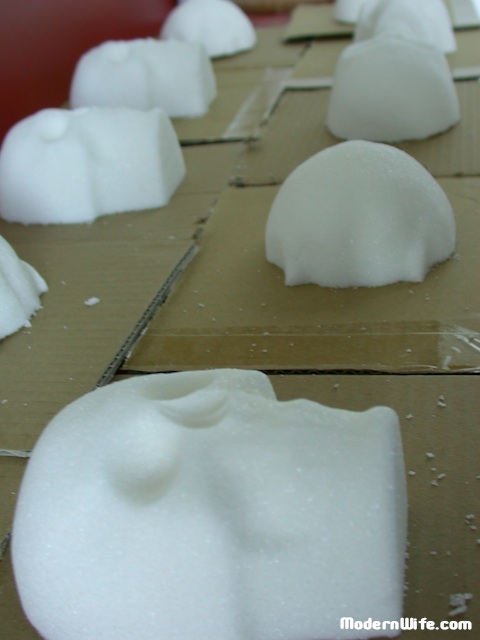
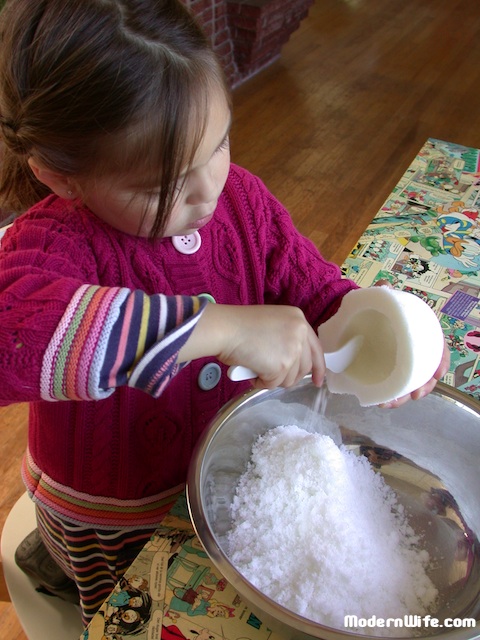
Sugar Skulls
We prepare the sugar skulls a week before El Dia de los Muertos. I got the skull mold from Casa Bonampak. I chose Large so that we had more surface to work with for little fingers like my 6-year-old’s, but they have other sizes available. I also bought a small jar of meringue powder, an indispensable ingredient in making the sugar skulls. Here is a list containing everything you would need (except the sugar).
Here is a detailed recipe for Sugar Skulls, with tables for measurement conversions and yield.
After the skulls are dry, we hollow them out and reuse the discarded sugar to make more skulls. It is incredibly still moldable.
Then we put the two sides of the skull together using Royal Icing (recipe here). One can make colored icing by adding food-based coloring to the Royal Icing in separate cups. I have a lot of store-bought icing in my pantry so we used it to decorate our skulls.

Here are some finished sugar skulls.

I put sequins in the middle of the eye sockets so that the eyes catch the light.
